モデルのファインチューニング
AIモデルのファインチューニングは、カスタムデータセットを使用して、GPUを備えたコンピューティング環境で事前にトレーニングされたモデルに対して**ファインチューニング**ジョブを実行できるようにする一般的な手法です。AI Toolkitは現在、GPUを備えたローカルマシンまたはクラウド(Azure Container App)でのSLMのファインチューニングをサポートしています。
ファインチューニングされたモデルは、ローカルにダウンロードしてGPUで推論テストを行ったり、CPUでローカルに実行するために量子化したりできます。ファインチューニングされたモデルは、リモートモデルとしてクラウド環境にデプロイすることもできます。
VS Code 用 AI Toolkit (プレビュー) を使用して Azure で AI モデルをファインチューニング
VS Code 用 AI Toolkit は、モデルのファインチューニングを実行し、クラウドで推論エンドポイントをホストするための Azure Container App のプロビジョニングをサポートするようになりました。
クラウド環境をセットアップする
-
リモートの Azure Container Apps 環境でモデルのファインチューニングと推論を実行するには、サブスクリプションに十分な GPU 容量があることを確認してください。アプリケーションに必要な容量をリクエストするには、サポート チケット を送信してください。GPU 容量の詳細はこちら
-
HuggingFace のプライベート データセットを使用している場合、またはベース モデルにアクセス制御が必要な場合は、HuggingFace アカウント があり、アクセス トークンを生成 していることを確認してください。
-
Mistral または Llama をファインチューニングしている場合は、HuggingFace のライセンスに同意してください。
-
VS Code 用 AI Toolkit でリモート ファインチューニングおよび推論機能フラグを有効にする
- ファイル -> 設定 -> 設定を選択して VS Code の設定を開きます。
- 拡張機能 に移動し、AI Toolkit を選択します。
- 「Azure Container Apps でファインチューニングと推論を実行できるようにする」 オプションを選択します。
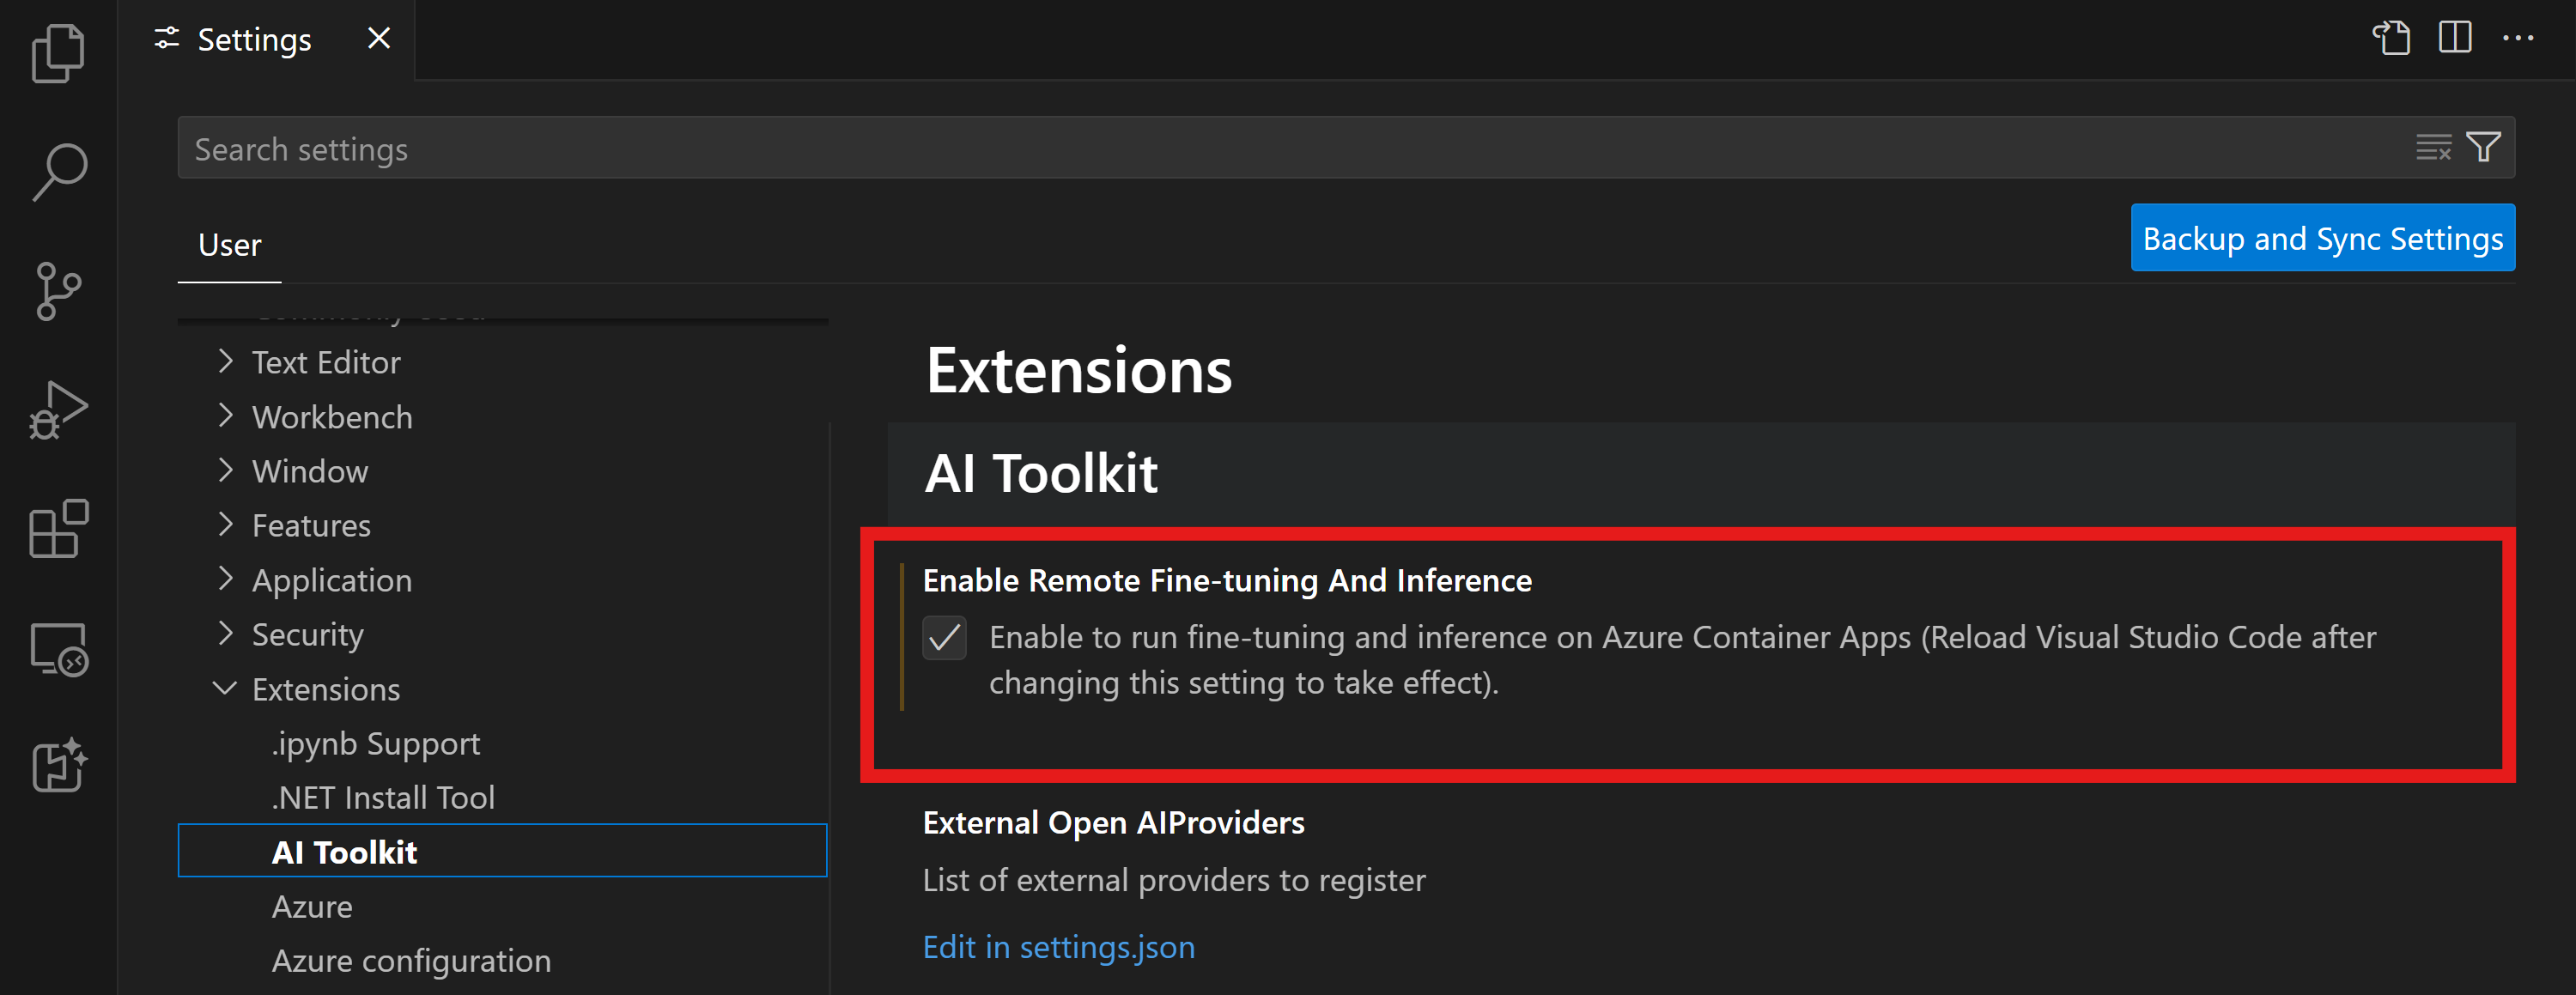
- 変更を有効にするには、VS Code をリロードします。
ファインチューニング プロジェクトの足場を組む
- コマンド パレットで
AI Toolkit: Focus on Tools Viewを実行します (⇧⌘P (Windows, Linux Ctrl+Shift+P)) Fine-tuningに移動してモデル カタログにアクセスします。ファインチューニングするモデルを選択します。プロジェクトに名前を割り当て、マシン上の場所を選択します。次に、"Configure Project" ボタンをクリックします。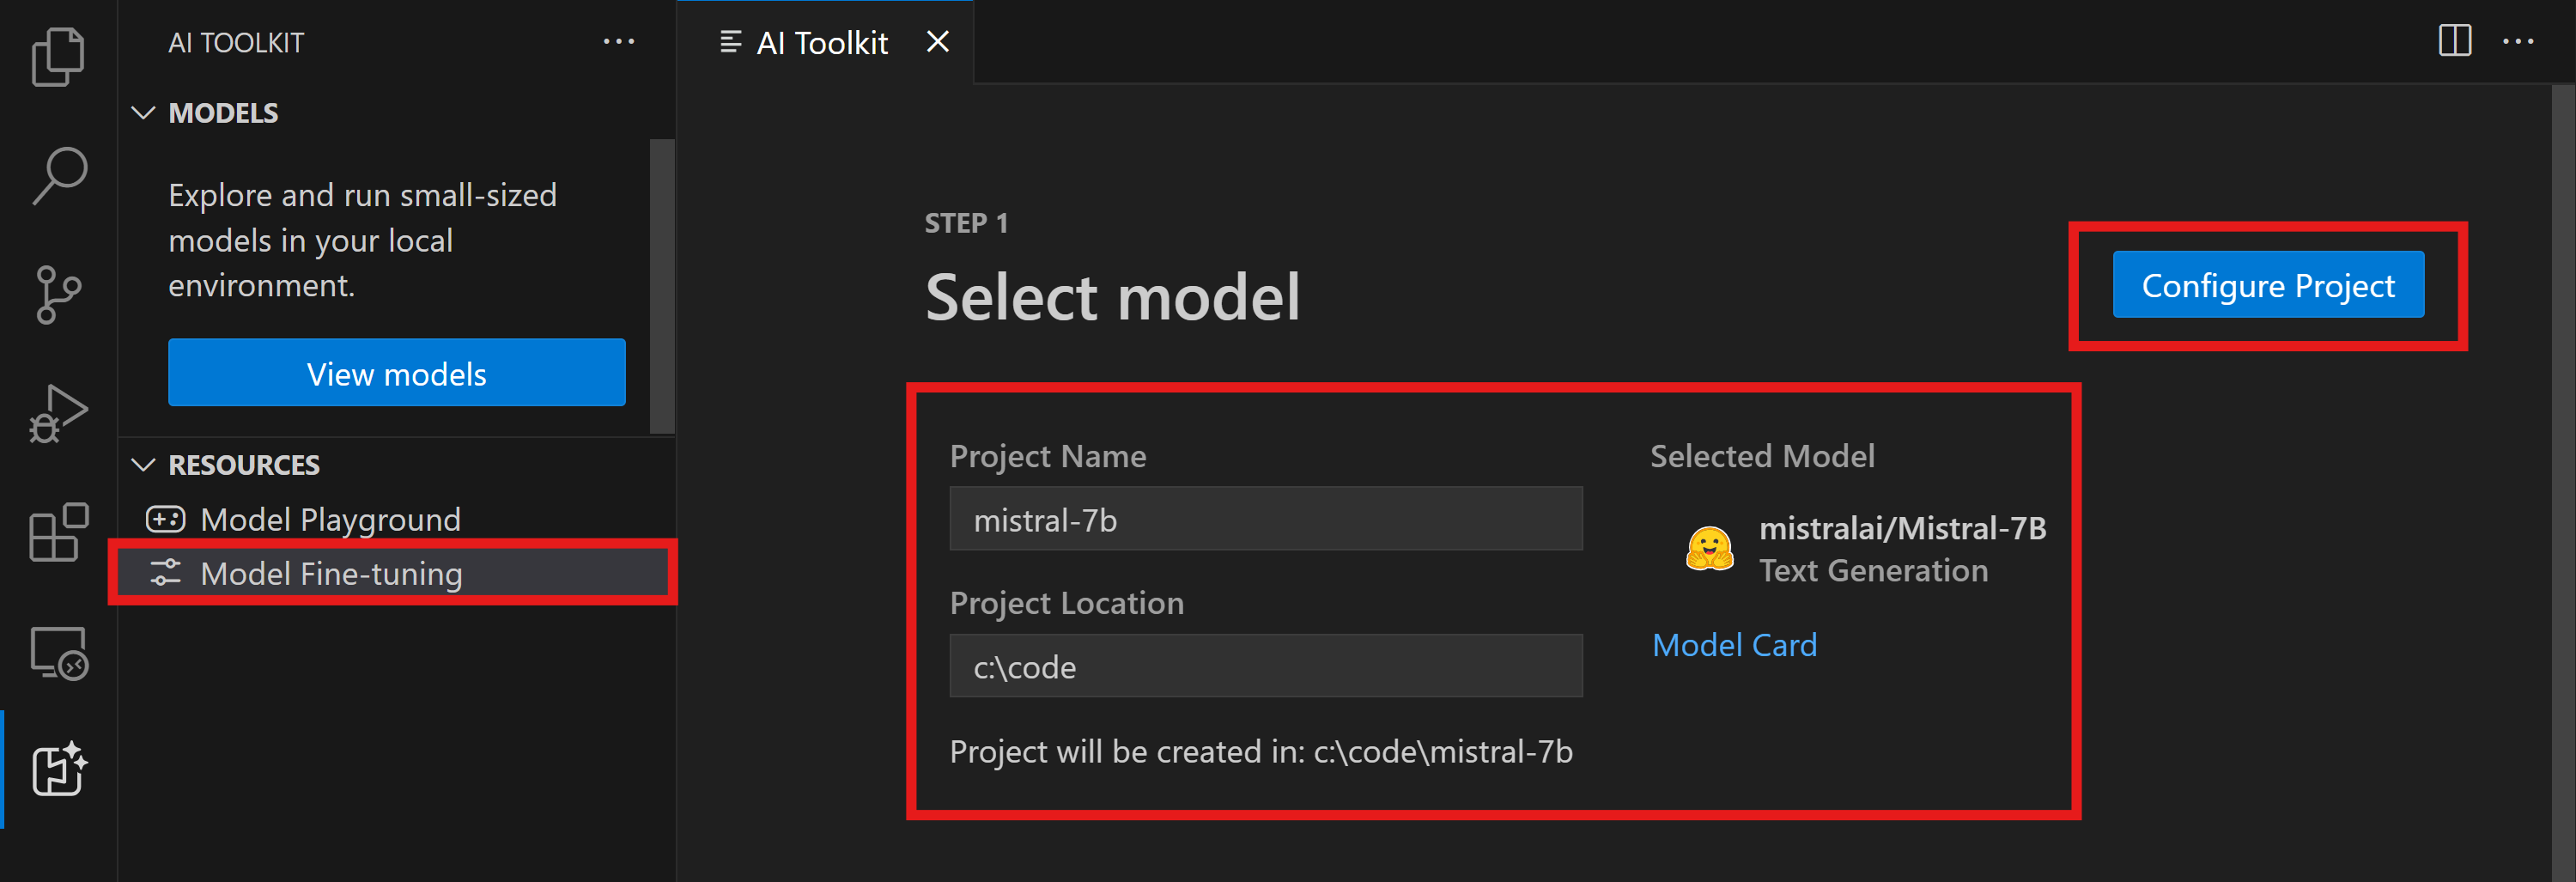
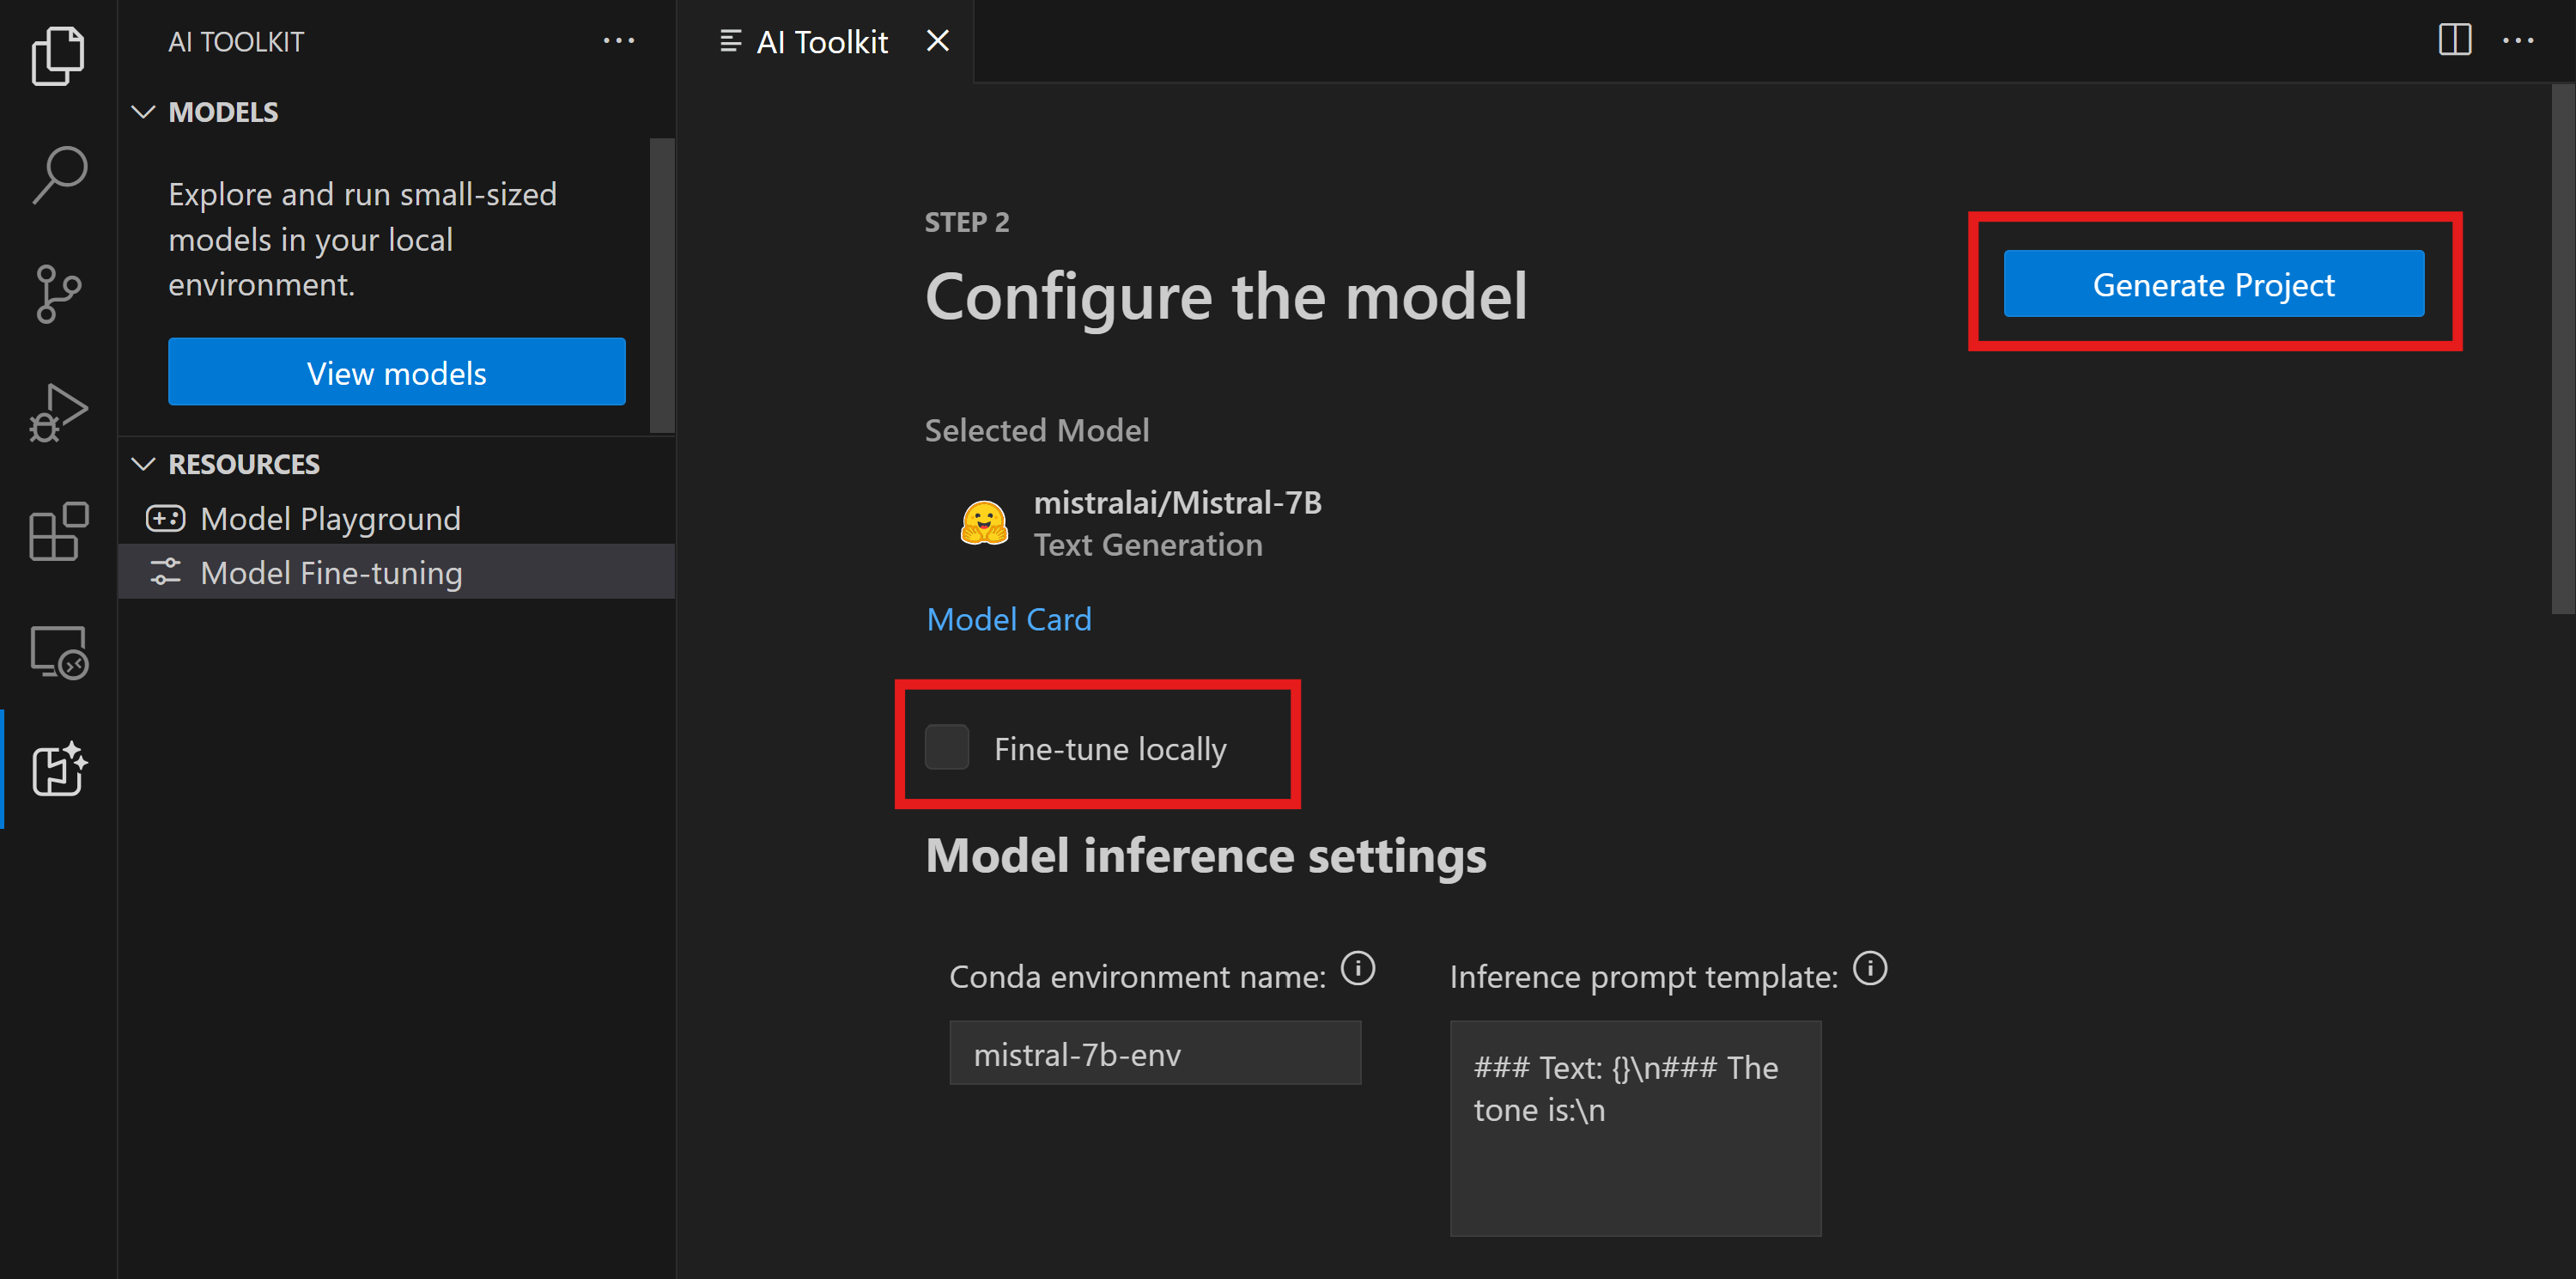
- プロジェクト構成
- 「ローカルでファインチューニング」 オプションは有効にしないでください。
- Olive 構成設定が、事前設定されたデフォルト値とともに表示されます。必要に応じて、これらの構成を調整し、入力してください。
- Generate Project に進みます。この段階では WSL を活用し、新しい Conda 環境をセットアップして、Dev Containers を含む将来の更新に備えます。
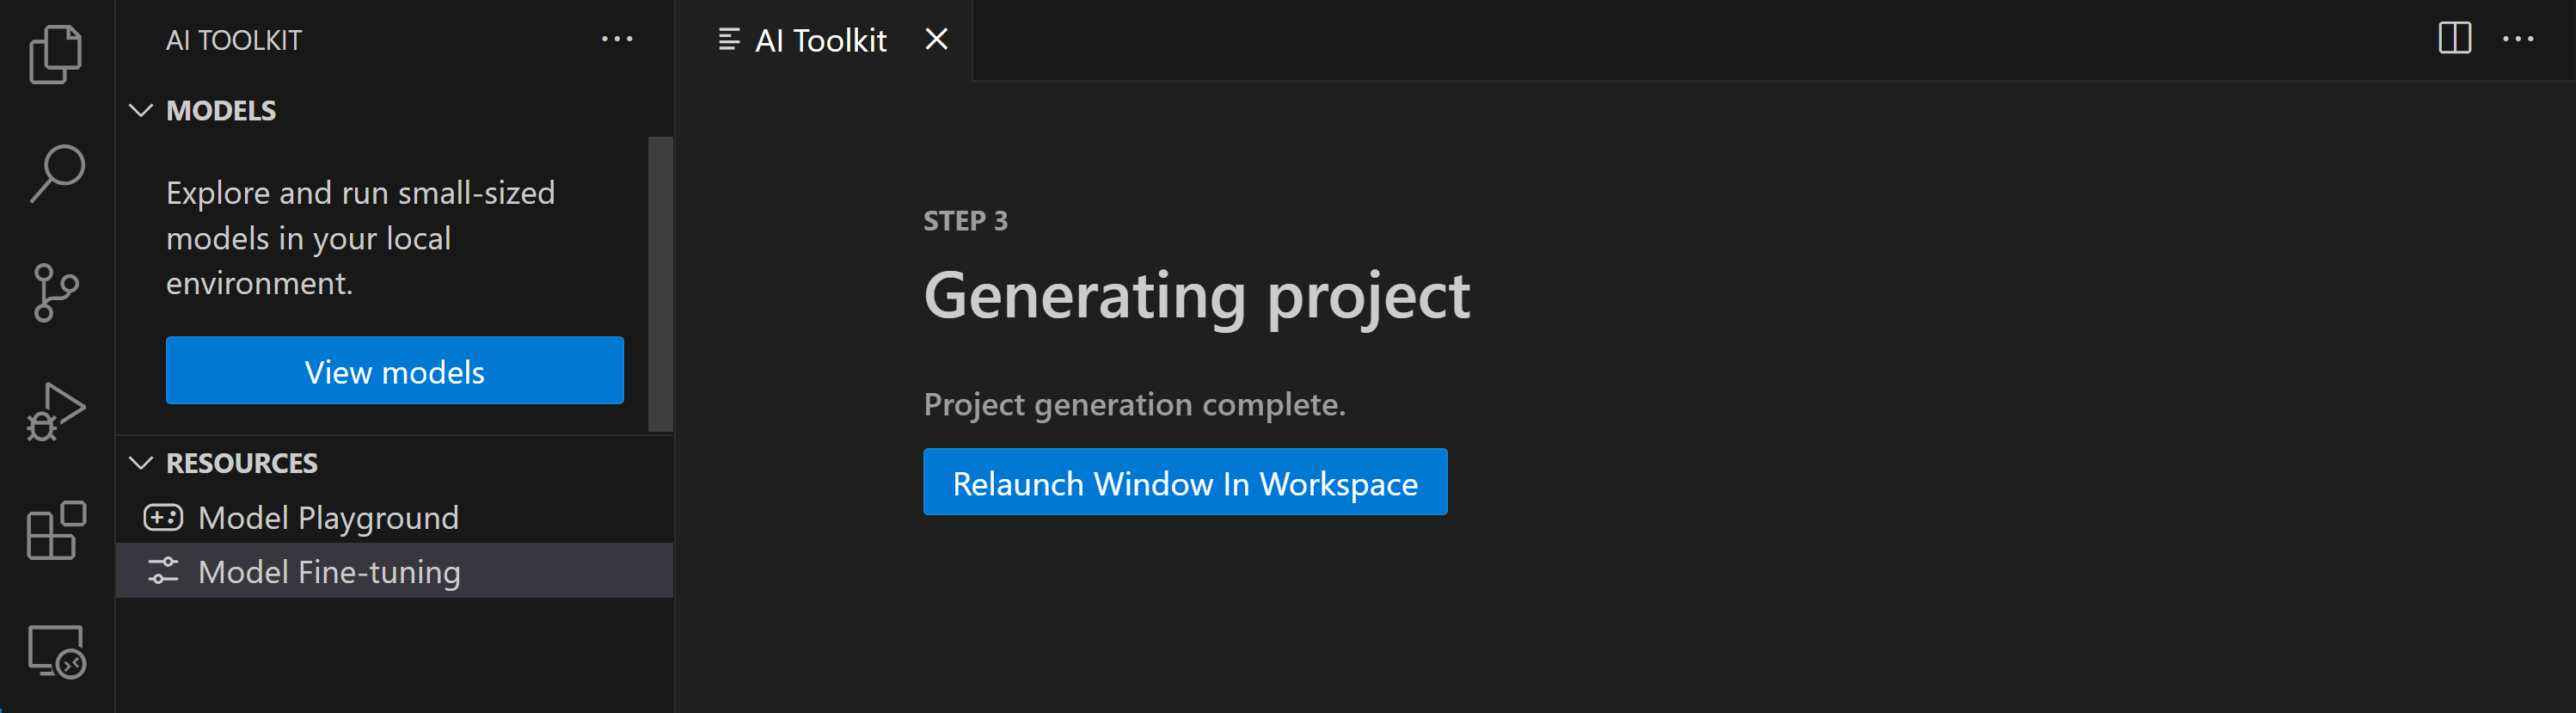
- "Relaunch Window In Workspace" を選択して、ファインチューニング プロジェクトを開きます。
プロジェクトは現在、VS Code 用 AI Toolkit 内でローカルまたはリモートで動作します。プロジェクト作成時に "Fine-tune locally" を選択した場合、クラウド リソースなしで WSL 内でのみ実行されます。それ以外の場合、プロジェクトはリモートの Azure Container App 環境での実行に制限されます。
Azure リソースのプロビジョニング
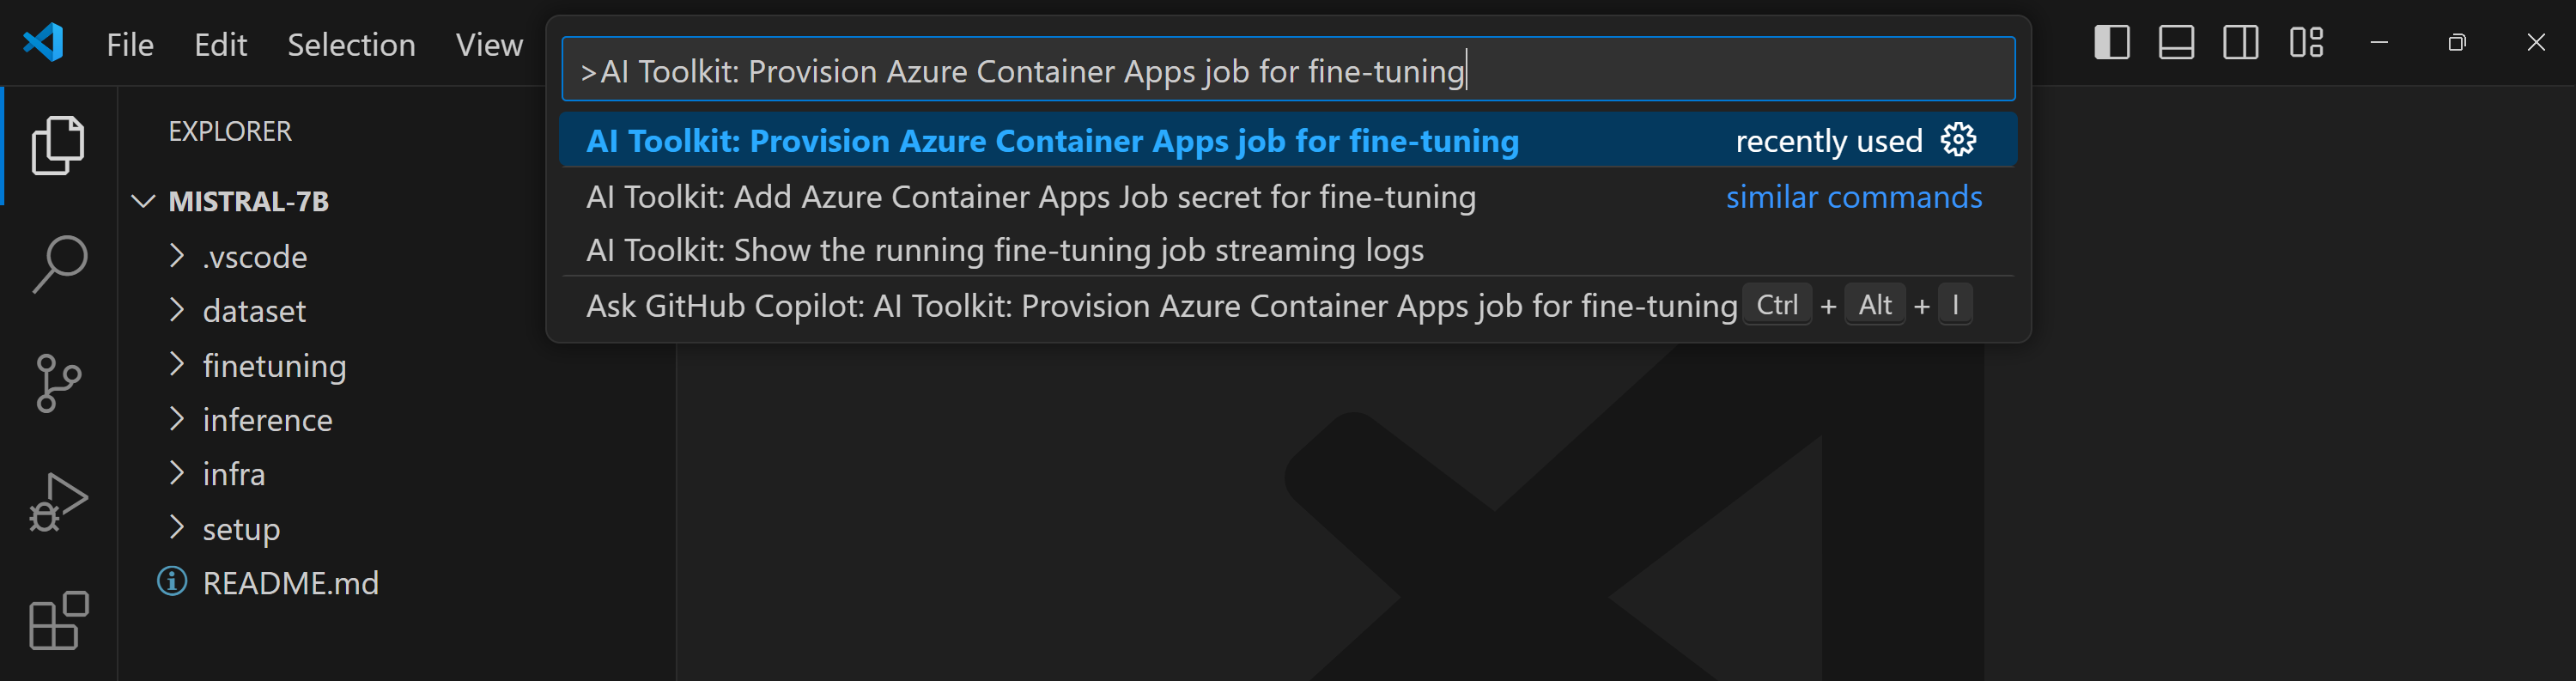
開始するには、リモート ファインチューニング用の Azure リソースをプロビジョニングする必要があります。コマンド パレットから AI Toolkit: Provision Azure Container Apps job for fine-tuning を見つけて実行します。このプロセス中に、Azure サブスクリプションとリソース グループを選択するように求められます。
出力チャネルに表示されるリンクからプロビジョニングの進捗状況を監視します。 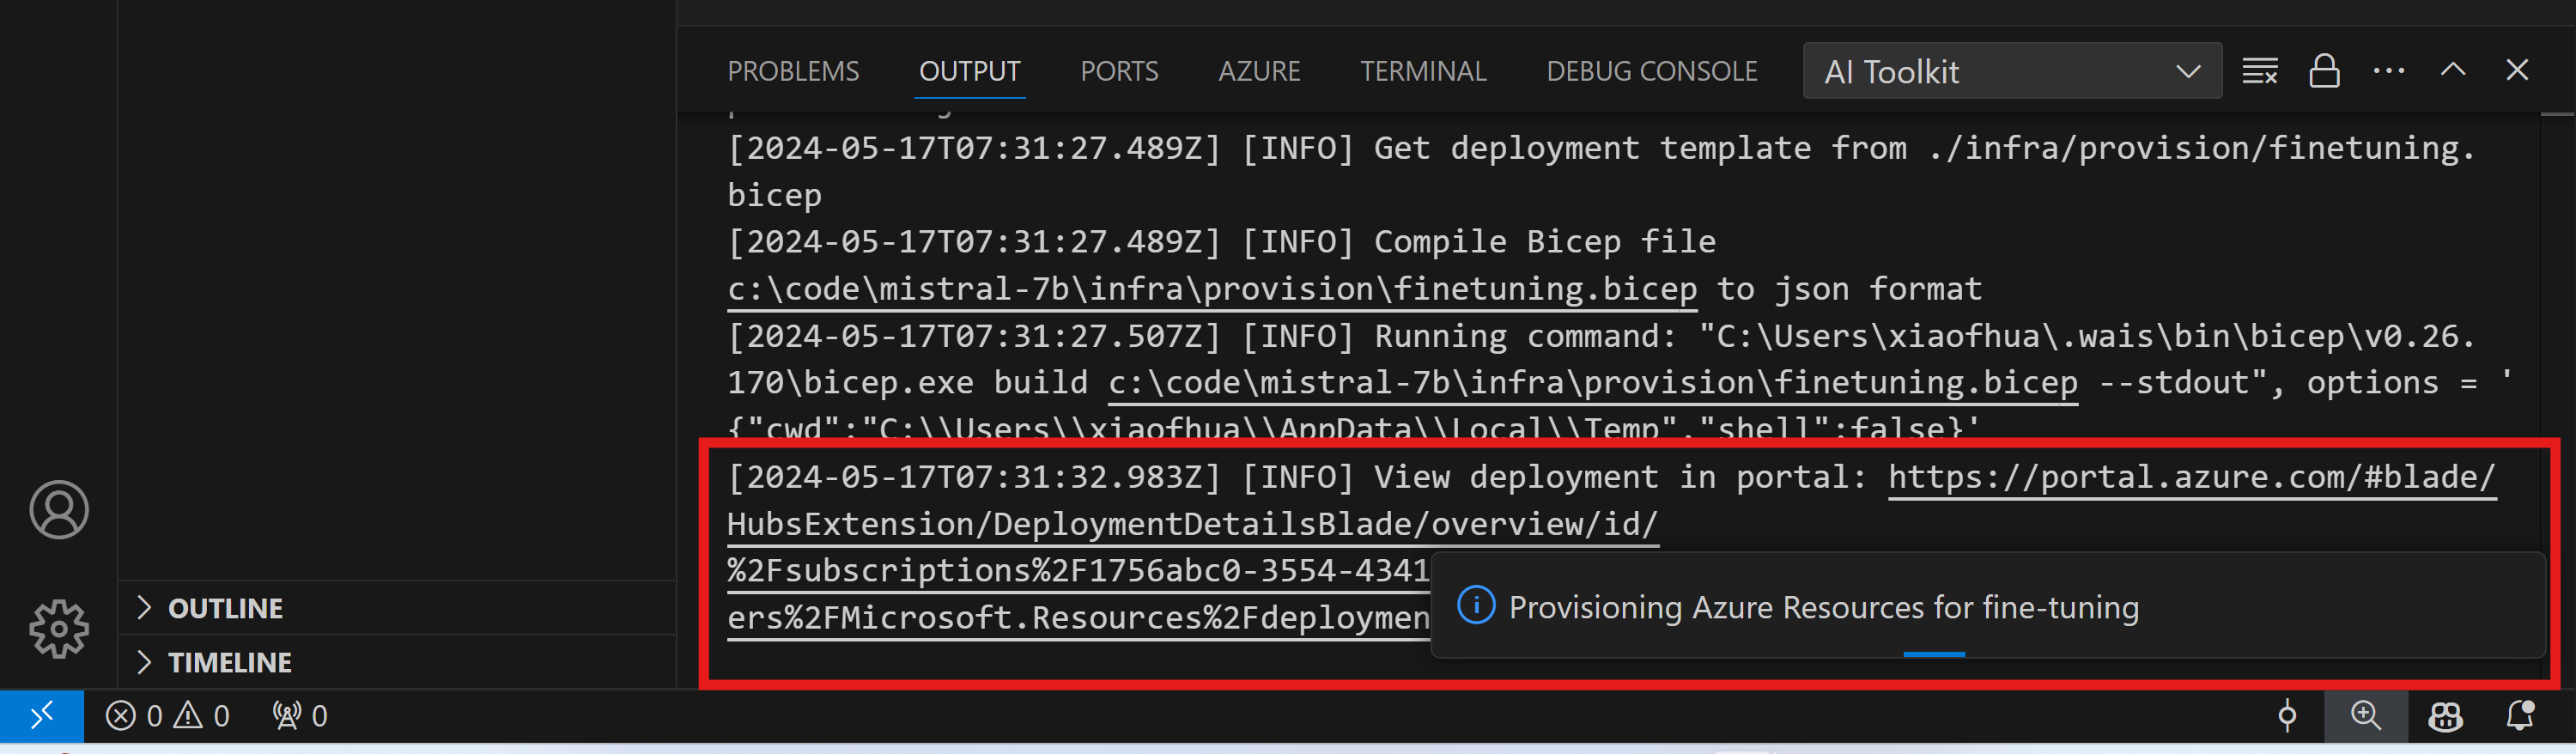
ファインチューニングを実行する
リモート ファインチューニング ジョブを開始するには、コマンド パレットで AI Toolkit: Run fine-tuning コマンドを実行します。

拡張機能は次の操作を実行します
-
ワークスペースを Azure Files と同期します。
-
./infra/fintuning.config.jsonで指定されたコマンドを使用して Azure Container App ジョブをトリガーします。
QLoRA はファインチューニングに使用され、ファインチューニング プロセスは推論中にモデルが使用する LoRA アダプターを作成します。
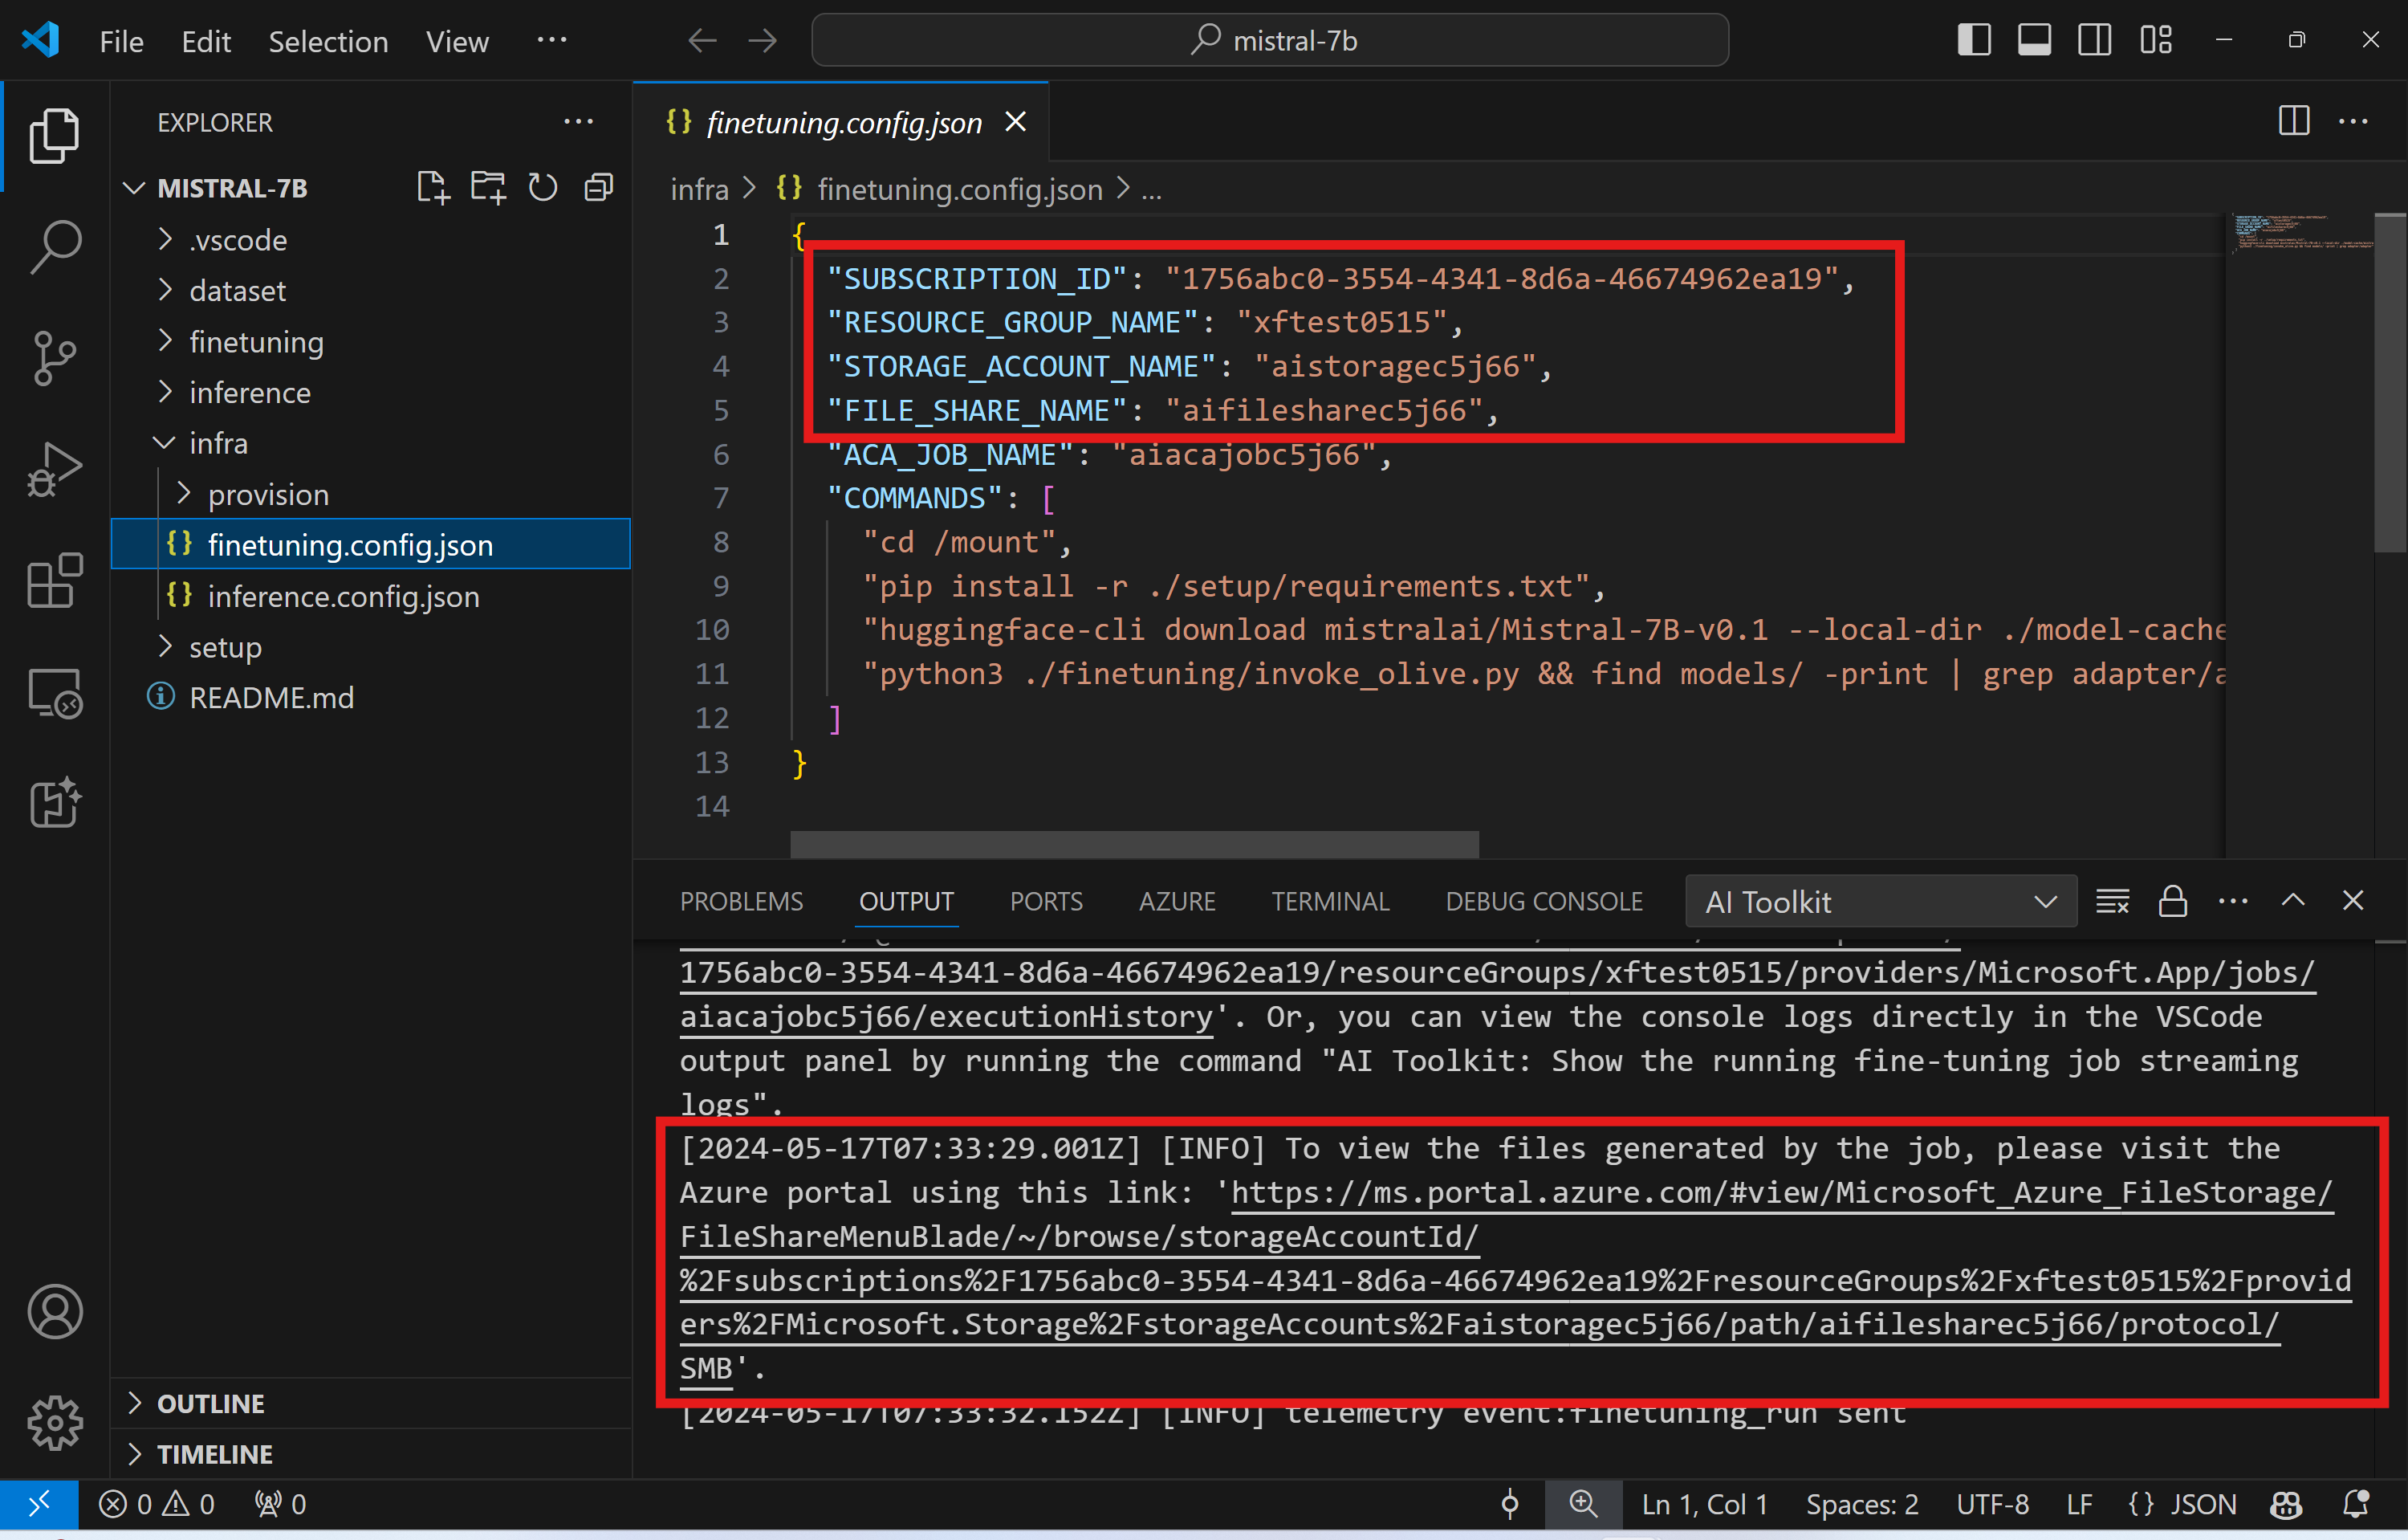
ファインチューニングの結果は Azure Files に保存されます。Azure ファイル共有の出力ファイルを確認するには、出力パネルに表示されるリンクを使用して Azure ポータルに移動します。または、Azure ポータルに直接アクセスし、./infra/fintuning.config.json で定義されている STORAGE_ACCOUNT_NAME という名前のストレージ アカウントと、./infra/fintuning.config.json で定義されている FILE_SHARE_NAME という名前のファイル共有を見つけることができます。
ログを表示
ファインチューニング ジョブが開始されたら、Azure ポータル にアクセスしてシステム ログとコンソール ログにアクセスできます。
または、VSCode の出力パネルでコンソール ログを直接表示することもできます。
ジョブの開始には数分かかる場合があります。すでに実行中のジョブがある場合、現在のジョブは後で開始するためにキューに入れられる可能性があります。
Azure でログを表示およびクエリする
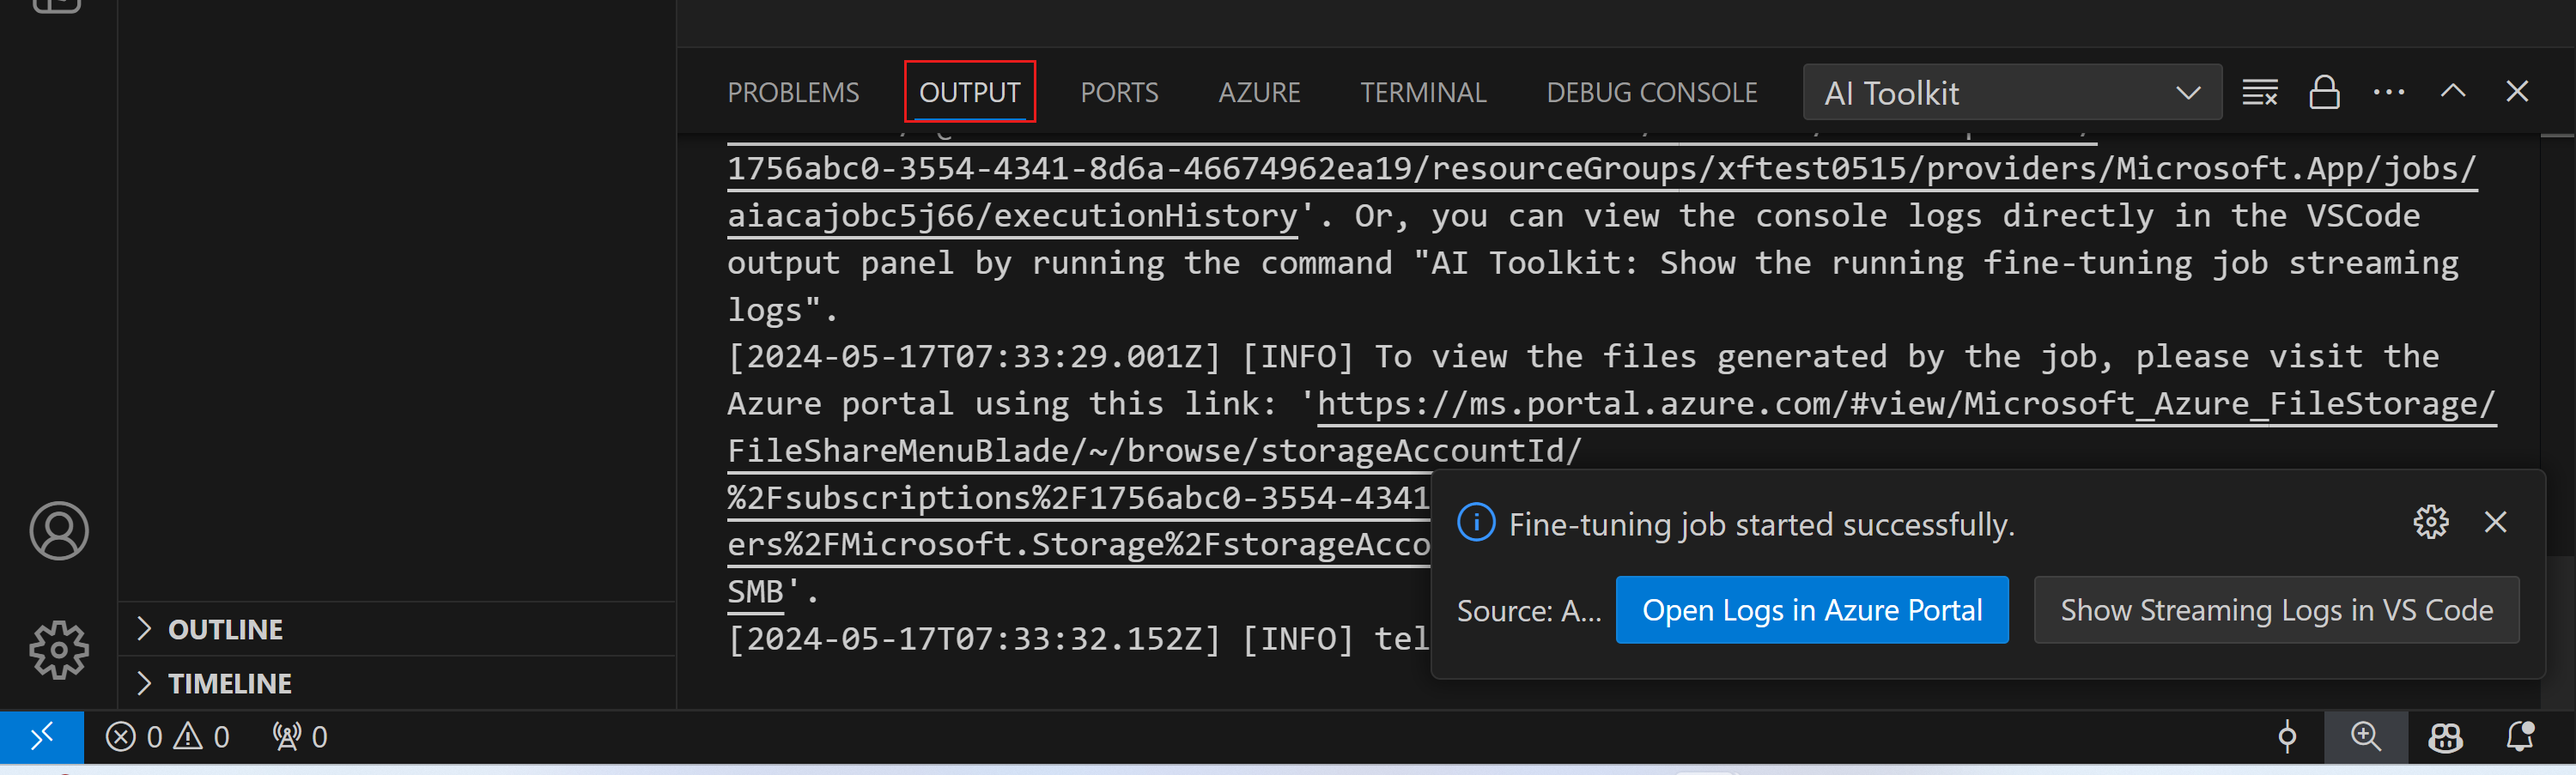
ファインチューニング ジョブがトリガーされた後、VSCode の通知から "Open Logs in Azure Portal" ボタンを選択して Azure でログを表示できます。
または、Azure Portal をすでに開いている場合は、"Execution history" パネルから Azure Container Apps ジョブのジョブ履歴を見つけます。
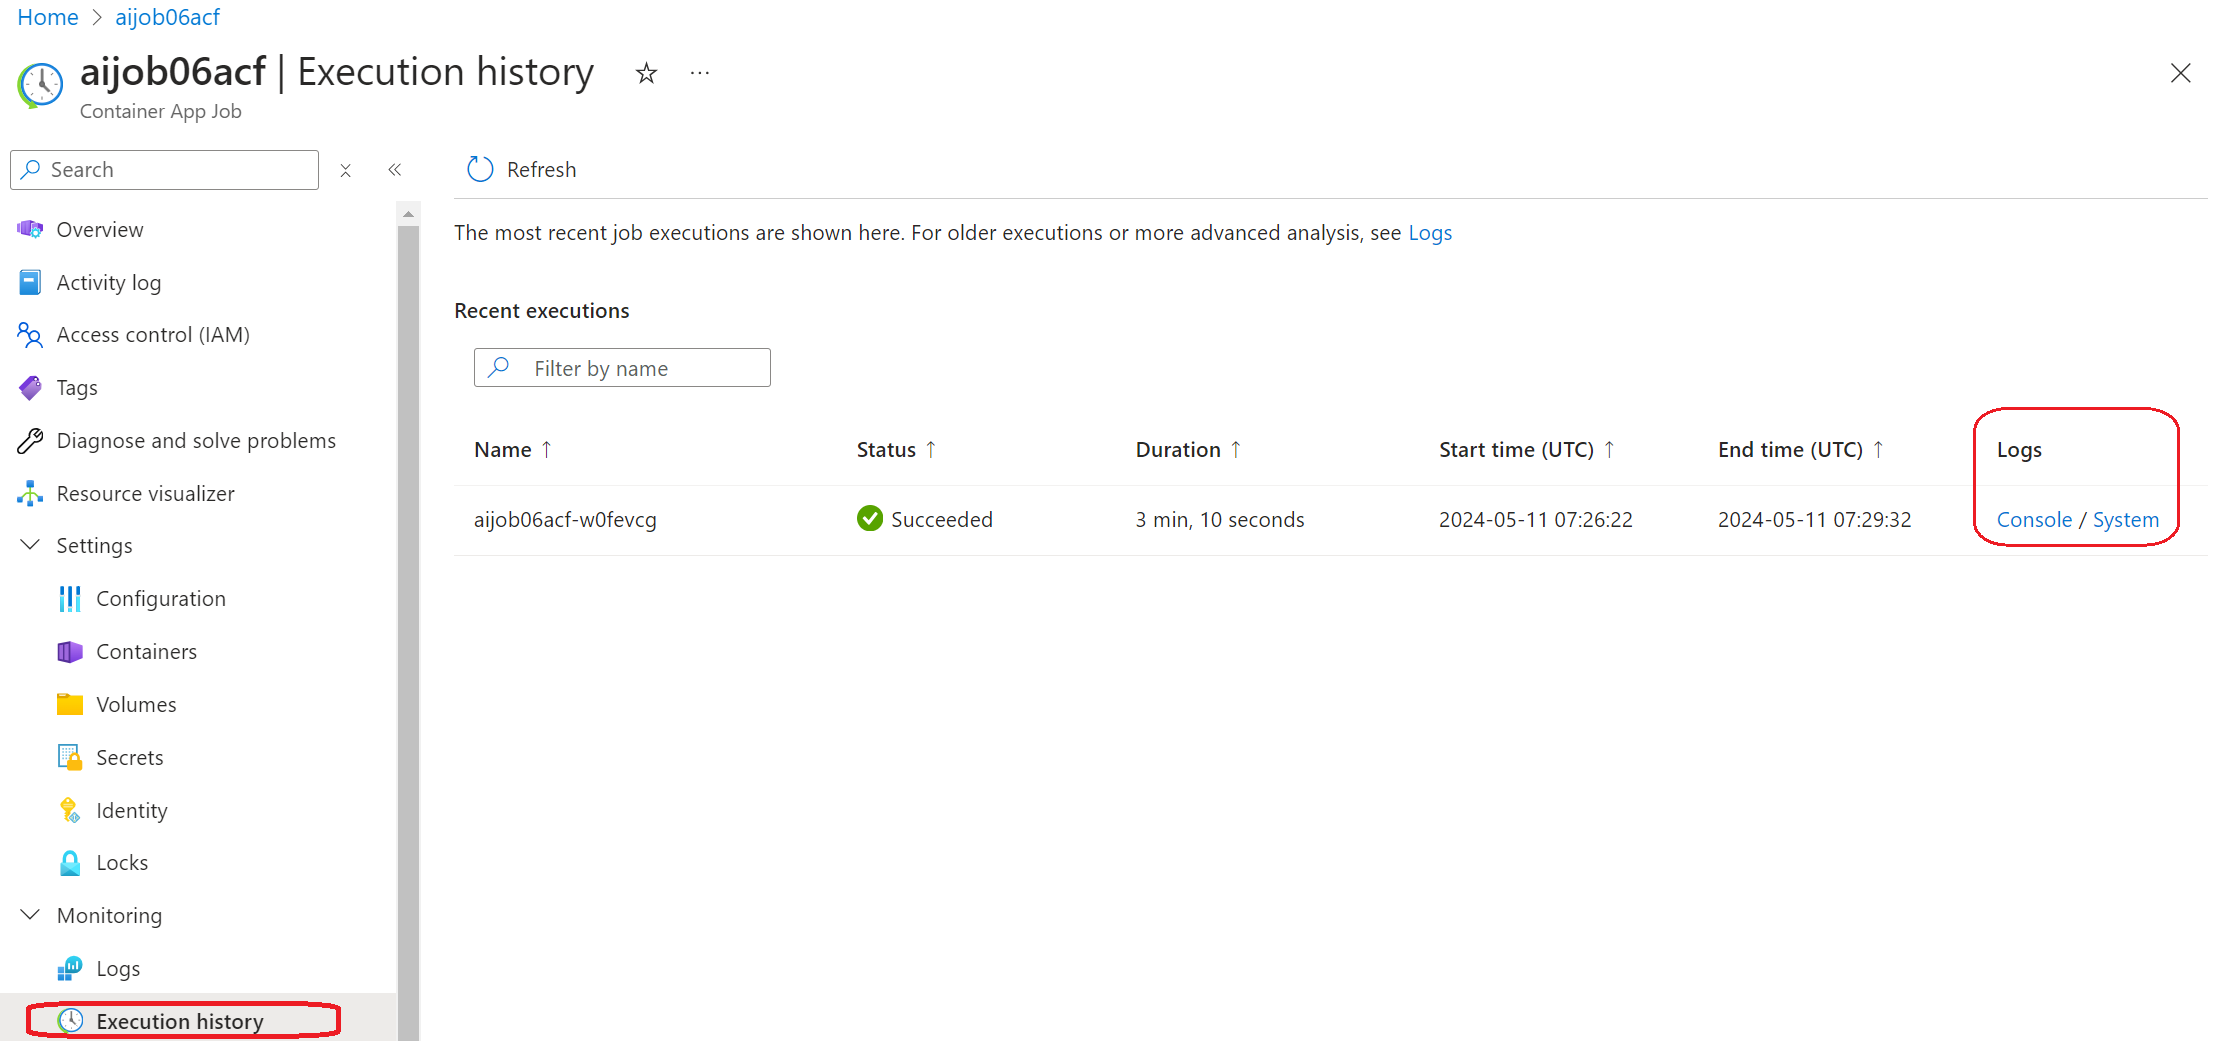
ログには「コンソール」と「システム」の 2 種類があります。
- コンソール ログは、
stderrおよびstdoutメッセージを含む、アプリからのメッセージです。これは、ストリーミング ログ セクションですでに見たものです。 - システム ログは、サービス レベルのイベントのステータスを含む、Azure Container Apps サービスからのメッセージです。
ログを表示およびクエリするには、「コンソール」ボタンを選択し、ログ分析ページに移動して、すべてのログを表示し、クエリを作成できます。

Azure Container Apps ログの詳細については、Azure Container Apps のアプリケーション ログ を参照してください。
VSCode でストリーミング ログを表示する
ファインチューニング ジョブを開始した後、VSCode の通知にある "Show Streaming Logs in VS Code" ボタンを選択して、Azure でログを表示することもできます。
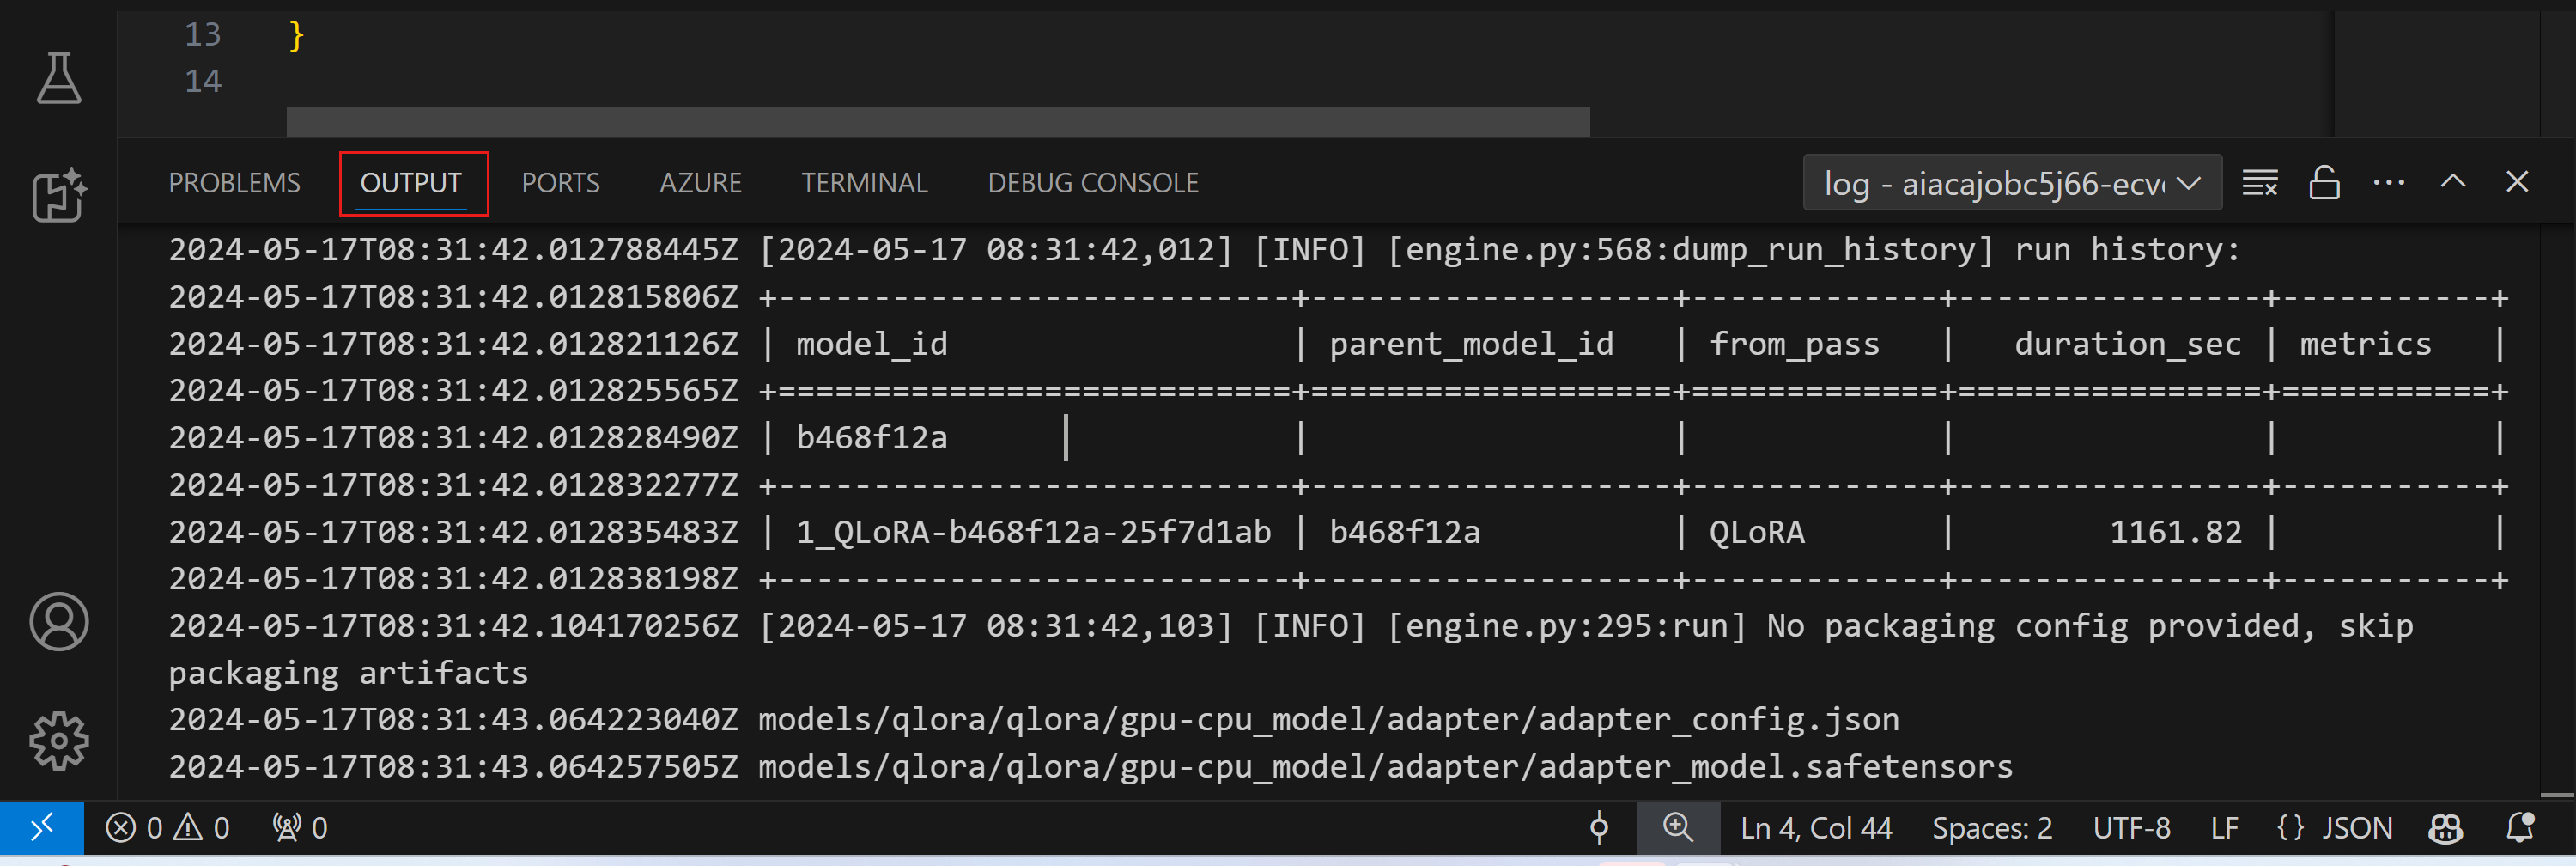
または、コマンド パレットで AI Toolkit: Show the running fine-tuning job streaming logs コマンドを実行することもできます。

実行中のファインチューニング ジョブのストリーミング ログは、出力パネルに表示されます。
リソース不足により、ジョブがキューに入れられる場合があります。ログが表示されない場合は、しばらく待ってからコマンドを実行して、ストリーミング ログに再接続してください。ストリーミング ログはタイムアウトして切断される場合があります。ただし、コマンドを再度実行することで再接続できます。
ファインチューニングされたモデルによる推論
アダプターがリモート環境でトレーニングされたら、シンプルな Gradio アプリケーションを使用してモデルと対話します。
Azure リソースのプロビジョニング
ファインチューニング プロセスと同様に、コマンド パレットから AI Toolkit: Provision Azure Container Apps for inference を実行して、リモート推論用の Azure リソースを設定する必要があります。この設定中に、Azure サブスクリプションとリソース グループを選択するように求められます。

デフォルトでは、推論用のサブスクリプションとリソース グループは、ファインチューニングに使用されたものと一致する必要があります。推論は同じ Azure Container App 環境を使用し、ファインチューニング ステップで生成された Azure Files に保存されているモデルとモデル アダプターにアクセスします。
推論のためのデプロイ
推論コードを改訂したり、推論モデルを再ロードしたりする場合は、AI Toolkit: Deploy for inference コマンドを実行してください。これにより、最新のコードが ACA と同期され、レプリカが再起動されます。

デプロイが正常に完了した後、モデルはこのエンドポイントを使用して評価する準備が整いました。VSCode の通知に表示される "Go to Inference Endpoint" ボタンを選択して、推論 API にアクセスできます。または、Web API エンドポイントは ./infra/inference.config.json および出力パネルの ACA_APP_ENDPOINT で見つけることができます。
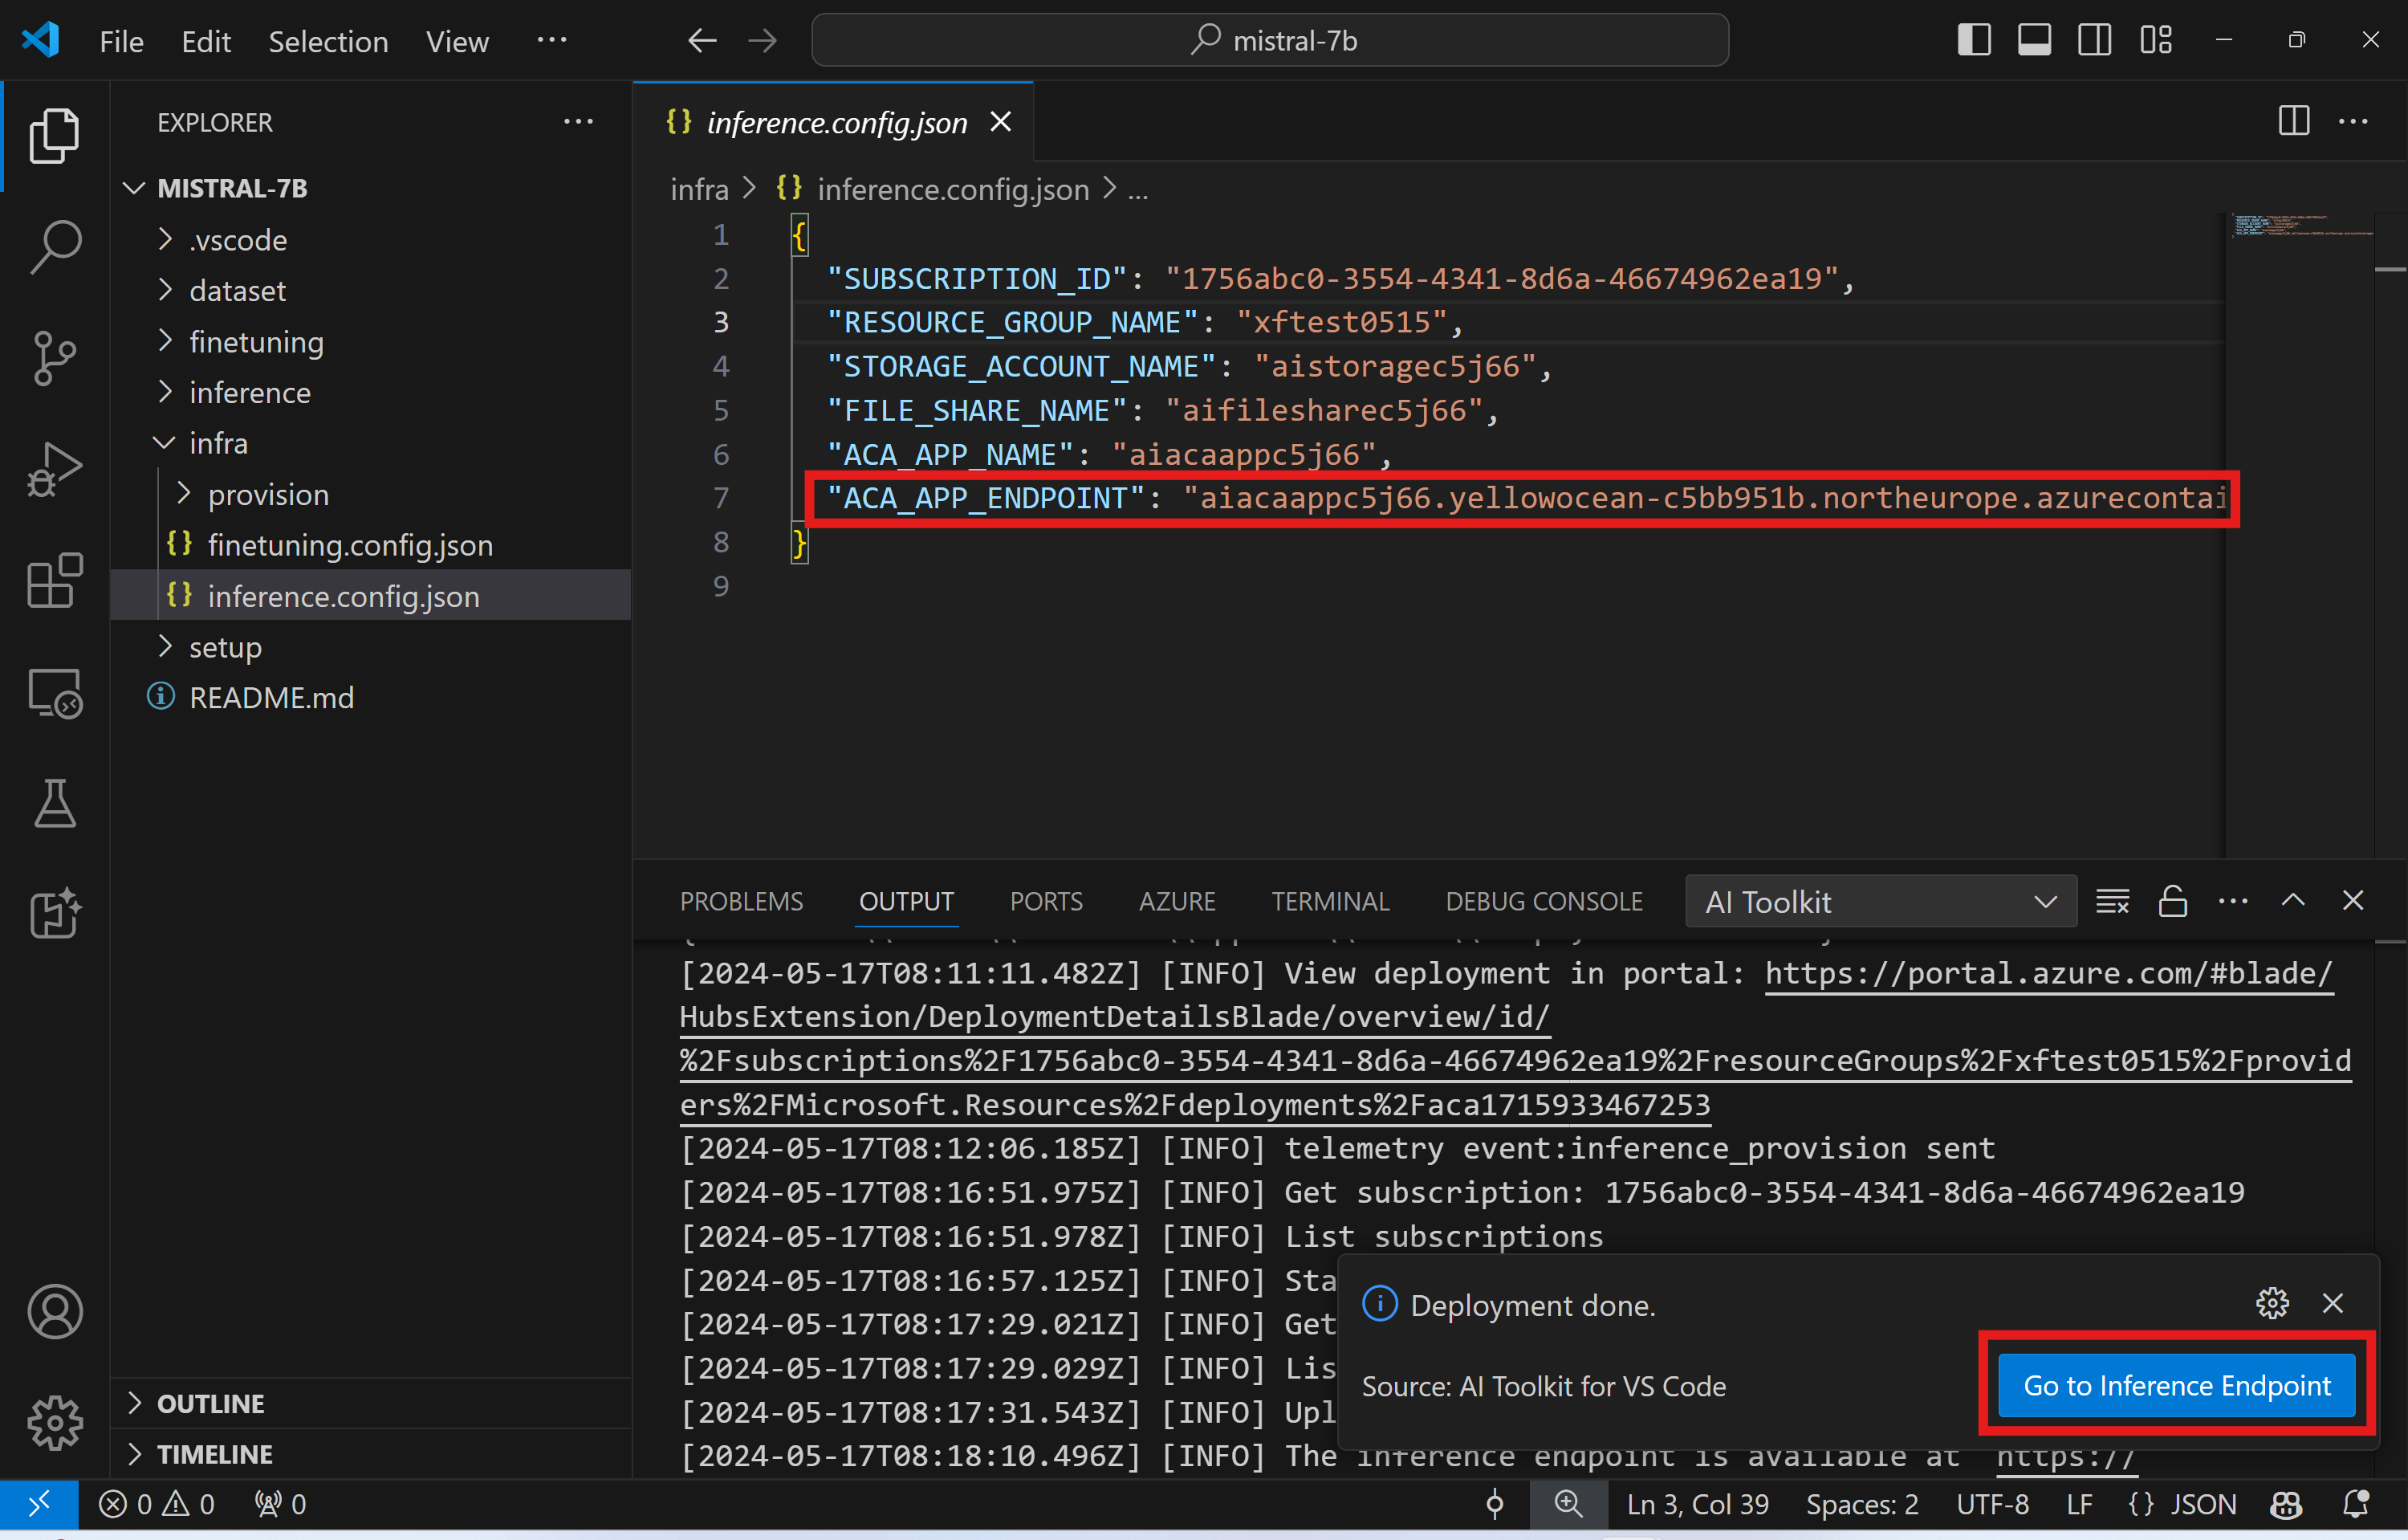
推論エンドポイントが完全に機能するまでには、数分かかる場合があります。
高度な使い方
ファインチューニング プロジェクトのコンポーネント
| フォルダー | コンテンツ |
|---|---|
infra |
リモート操作に必要なすべての構成が含まれています。 |
infra/provision/finetuning.parameters.json |
ファインチューニング用の Azure リソースのプロビジョニングに使用される bicep テンプレートのパラメーターを保持します。 |
infra/provision/finetuning.bicep |
ファインチューニング用の Azure リソースをプロビジョニングするためのテンプレートが含まれています。 |
infra/finetuning.config.json |
AI Toolkit: Provision Azure Container Apps job for fine-tuning コマンドによって生成された構成ファイル。他のリモート コマンド パレットへの入力として使用されます。 |
Azure Container Apps でのファインチューニングのシークレット構成
Azure Container App Secrets は、HuggingFace トークンや Weights & Biases API キーなどの機密データを Azure Container Apps 内で安全に保存および管理する方法を提供します。AI ツールキットのコマンド パレットを使用して、プロビジョニングされた Azure コンテナー アプリ ジョブ (./finetuning.config.json に保存) にシークレットを入力できます。これらのシークレットは、すべてのコンテナーで**環境変数**として設定されます。
手順
-
コマンド パレットで
AI Toolkit: Add Azure Container Apps Job secret for fine-tuningと入力して選択します。
-
シークレット名と値を入力: シークレットの名前と値を入力するように求められます。

 たとえば、プライベートな HuggingFace データセットや Hugging Face アクセス制御が必要なモデルを使用している場合は、Hugging Face Hub での手動ログインの必要性を避けるために、HuggingFace トークンを環境変数
 HF_TOKENとして設定します。
シークレットを設定したら、Azure Container App でそれを使用できます。シークレットは、コンテナー アプリの環境変数に設定されます。
ファインチューニング用の Azure リソース プロビジョニングの構成
このガイドは、AI Toolkit: Provision Azure Container Apps job for fine-tuning コマンドの構成に役立ちます。
構成パラメーターは ./infra/provision/finetuning.parameters.json ファイルにあります。詳細は以下のとおりです。
| パラメーター | 説明 |
|---|---|
defaultCommands |
これは、ファインチューニング ジョブを開始するためのデフォルト コマンドです。./infra/finetuning.config.json で上書きできます。 |
maximumInstanceCount |
このパラメーターは、GPU インスタンスの最大容量を設定します。 |
timeout |
これは、Azure Container App のファインチューニング ジョブのタイムアウトを秒単位で設定します。デフォルト値は 10800 で、3 時間に相当します。Azure Container App ジョブがこのタイムアウトに達すると、ファインチューニング プロセスは停止します。ただし、チェックポイントはデフォルトで保存されるため、再度実行された場合でも、ファインチューニング プロセスは最初からではなく、最後のチェックポイントから再開できます。 |
location |
これは、Azure リソースがプロビジョニングされる場所です。デフォルト値は、選択したリソース グループの場所と同じです。 |
storageAccountName、fileShareName acaEnvironmentName、acaEnvironmentStorageName、acaJobName、acaLogAnalyticsName |
これらのパラメーターは、プロビジョニング用の Azure リソースに名前を付けるために使用されます。新しく未使用のリソース名を入力して独自のカスタム名のリソースを作成することも、既存の Azure リソースの名前を入力してそれを使用することもできます。詳細については、「既存の Azure リソースの使用」セクションを参照してください。 |
既存の Azure リソースの使用
ファインチューニング用に構成する必要がある既存の Azure リソースがある場合は、それらの名前を ./infra/provision/finetuning.parameters.json ファイルで指定し、コマンド パレットから AI Toolkit: Provision Azure Container Apps job for fine-tuning を実行できます。これにより、指定したリソースが更新され、不足しているリソースが作成されます。
たとえば、既存の Azure コンテナー環境がある場合、./infra/finetuning.parameters.json は次のようになります。
{
    "$schema": "https://schema.management.azure.com/schemas/2019-04-01/deploymentParameters.json#",
    "contentVersion": "1.0.0.0",
    "parameters": {
      ...
      "acaEnvironmentName": {
        "value": "<your-aca-env-name>"
      },
      "acaEnvironmentStorageName": {
        "value": null
      },
      ...
    }
  }
手動プロビジョニング
Azure リソースを手動でセットアップする場合は、./infra/provision フォルダーにある bicep ファイルを使用できます。AI Toolkit コマンド パレットを使用せずにすべての Azure リソースをすでにセットアップして構成している場合は、finetune.config.json ファイルにリソース名を入力するだけです。
例
{
  "SUBSCRIPTION_ID": "<your-subscription-id>",
  "RESOURCE_GROUP_NAME": "<your-resource-group-name>",
  "STORAGE_ACCOUNT_NAME": "<your-storage-account-name>",
  "FILE_SHARE_NAME": "<your-file-share-name>",
  "ACA_JOB_NAME": "<your-aca-job-name>",
  "COMMANDS": [
    "cd /mount",
    "pip install huggingface-hub==0.22.2",
    "huggingface-cli download <your-model-name> --local-dir ./model-cache/<your-model-name> --local-dir-use-symlinks False",
    "pip install -r ./setup/requirements.txt",
    "python3 ./finetuning/invoke_olive.py && find models/ -print | grep adapter/adapter"
  ]
}
テンプレートに含まれる推論コンポーネント
| フォルダー | コンテンツ |
|---|---|
infra |
リモート操作に必要なすべての構成が含まれています。 |
infra/provision/inference.parameters.json |
推論用の Azure リソースのプロビジョニングに使用される bicep テンプレートのパラメーターを保持します。 |
infra/provision/inference.bicep |
推論用の Azure リソースをプロビジョニングするためのテンプレートが含まれています。 |
infra/inference.config.json |
AI Toolkit: Provision Azure Container Apps for inference コマンドによって生成された構成ファイル。他のリモート コマンド パレットへの入力として使用されます。 |
Azure リソース プロビジョニングの構成
このガイドは、AI Toolkit: Provision Azure Container Apps for inference コマンドの構成に役立ちます。
構成パラメーターは ./infra/provision/inference.parameters.json ファイルにあります。詳細は以下のとおりです。
| パラメーター | 説明 |
|---|---|
defaultCommands |
これは、Web API を初期化するためのコマンドです。 |
maximumInstanceCount |
このパラメーターは、GPU インスタンスの最大容量を設定します。 |
location |
これは、Azure リソースがプロビジョニングされる場所です。デフォルト値は、選択したリソース グループの場所と同じです。 |
storageAccountName、fileShareName acaEnvironmentName、acaEnvironmentStorageName、acaAppName、acaLogAnalyticsName |
これらのパラメーターは、プロビジョニング用の Azure リソースに名前を付けるために使用されます。デフォルトでは、ファインチューニング リソース名と同じになります。新しく未使用のリソース名を入力して独自のカスタム名のリソースを作成することも、既存の Azure リソースの名前を入力してそれを使用することもできます。詳細については、「既存の Azure リソースの使用」セクションを参照してください。 |
既存の Azure リソースの使用
デフォルトでは、推論プロビジョニングは、ファインチューニングに使用されたものと同じ Azure Container App 環境、ストレージ アカウント、Azure ファイル共有、および Azure Log Analytics を使用します。推論 API のためだけに別の Azure Container App が作成されます。
ファインチューニング ステップ中に Azure リソースをカスタマイズした場合、または推論用に独自の既存の Azure リソースを使用したい場合は、それらの名前を ./infra/inference.parameters.json ファイルで指定します。次に、コマンド パレットから AI Toolkit: Provision Azure Container Apps for inference コマンドを実行します。これにより、指定されたリソースが更新され、不足しているリソースが作成されます。
たとえば、既存の Azure コンテナー環境がある場合、./infra/finetuning.parameters.json は次のようになります。
{
    "$schema": "https://schema.management.azure.com/schemas/2019-04-01/deploymentParameters.json#",
    "contentVersion": "1.0.0.0",
    "parameters": {
      ...
      "acaEnvironmentName": {
        "value": "<your-aca-env-name>"
      },
      "acaEnvironmentStorageName": {
        "value": null
      },
      ...
    }
  }
手動プロビジョニング
Azure リソースを手動で構成する場合は、./infra/provision フォルダーにある bicep ファイルを使用できます。AI Toolkit コマンド パレットを使用せずにすべての Azure リソースをすでにセットアップして構成している場合は、inference.config.json ファイルにリソース名を入力するだけです。
例
{
  "SUBSCRIPTION_ID": "<your-subscription-id>",
  "RESOURCE_GROUP_NAME": "<your-resource-group-name>",
  "STORAGE_ACCOUNT_NAME": "<your-storage-account-name>",
  "FILE_SHARE_NAME": "<your-file-share-name>",
  "ACA_APP_NAME": "<your-aca-name>",
  "ACA_APP_ENDPOINT": "<your-aca-endpoint>"
}
学んだこと
この記事では、次のことを学びました
- Azure Container Apps でのファインチューニングと推論をサポートするように VS Code 用 AI Toolkit をセットアップします。
- VS Code 用 AI Toolkit でファインチューニング プロジェクトを作成します。
- データセットの選択とトレーニング パラメーターを含む、ファインチューニング ワークフローを構成します。
- ファインチューニング ワークフローを実行して、事前トレーニング済みのモデルを特定のデータセットに適合させます。
- メトリクスやログを含む、ファインチューニング プロセスの結果を表示します。
- モデル推論とテスト用のサンプル ノートブックを使用します。
- ファインチューニング プロジェクトをエクスポートして他のユーザーと共有します。
- 異なるデータセットまたはトレーニング パラメーターを使用してモデルを再評価します。
- 失敗したジョブを処理し、再実行のために構成を調整します。
- サポートされているモデルとファインチューニングの要件を理解します。
- VS Code 用 AI Toolkit を使用して、Azure リソースのプロビジョニング、ファインチューニング ジョブの実行、推論用のモデルのデプロイなど、ファインチューニング プロジェクトを管理します。