言語サーバー拡張機能ガイド
「プログラムによる言語機能」トピックで見たように、languages.* API を直接使用して言語機能を実装できます。しかし、Language Server 拡張機能は、そのような言語サポートを実装するための代替手段を提供します。
このトピックでは
- Language Server 拡張機能の利点を説明します。
Microsoft/vscode-languageserver-nodeライブラリを使用して Language Server を構築する手順を説明します。また、lsp-sampleのコードに直接ジャンプすることもできます。
なぜ Language Server なのか?
Language Server は、多くのプログラミング言語の編集エクスペリエンスを強化する Visual Studio Code 拡張機能の一種です。Language Server を使用すると、オートコンプリート、エラーチェック(診断)、定義へのジャンプ、および VS Code でサポートされている他の多くの言語機能を実装できます。
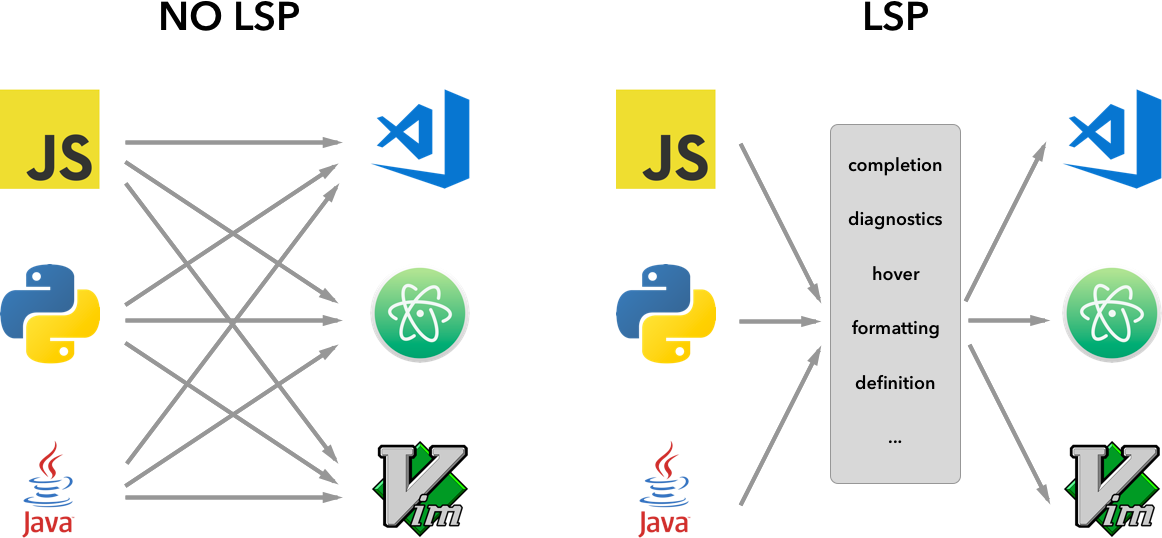
しかし、VS Code で言語機能をサポートする機能を実装する中で、3 つの一般的な問題が見つかりました。
第一に、Language Server は通常、ネイティブのプログラミング言語で実装されますが、これは Node.js ランタイムを持つ VS Code との統合に課題をもたらします。
さらに、言語機能はリソースを大量に消費する可能性があります。たとえば、ファイルを正しく検証するには、Language Server は大量のファイルを解析し、それらの抽象構文ツリーを構築し、静的プログラム解析を実行する必要があります。これらの操作は、かなりの CPU およびメモリ使用量をもたらす可能性があり、VS Code のパフォーマンスに影響がないことを保証する必要があります。
最後に、複数の言語ツールと複数のコードエディターを統合するには、かなりの労力が必要になる場合があります。言語ツール側から見ると、異なる API を持つコードエディターに適応する必要があります。コードエディター側から見ると、言語ツールから統一された API を期待することはできません。これにより、M 個の言語を N 個のコードエディターでサポートするには、M * N の作業が必要になります。
これらの問題を解決するために、Microsoft はLanguage Server Protocol を指定しました。これは、言語ツールとコードエディター間の通信を標準化します。これにより、Language Server はどの言語でも実装でき、独自のプロセスで実行してパフォーマンスコストを回避できます。なぜなら、Language Server Protocol を介してコードエディターと通信するからです。さらに、LSP 準拠の言語ツールは複数の LSP 準拠のコードエディターと統合でき、LSP 準拠のコードエディターは複数の LSP 準拠の言語ツールを簡単に採用できます。LSP は、言語ツールプロバイダーとコードエディターベンダーの両方にとって win-win です!
このガイドでは、以下のことを行います。
- 提供されているNode SDK を使用して、VS Code で Language Server 拡張機能を構築する方法を説明します。
- Language Server 拡張機能の実行、デバッグ、ログ記録、テスト方法を説明します。
- Language Server に関する高度なトピックへのリンクを提供します。
Language Server の実装
概要
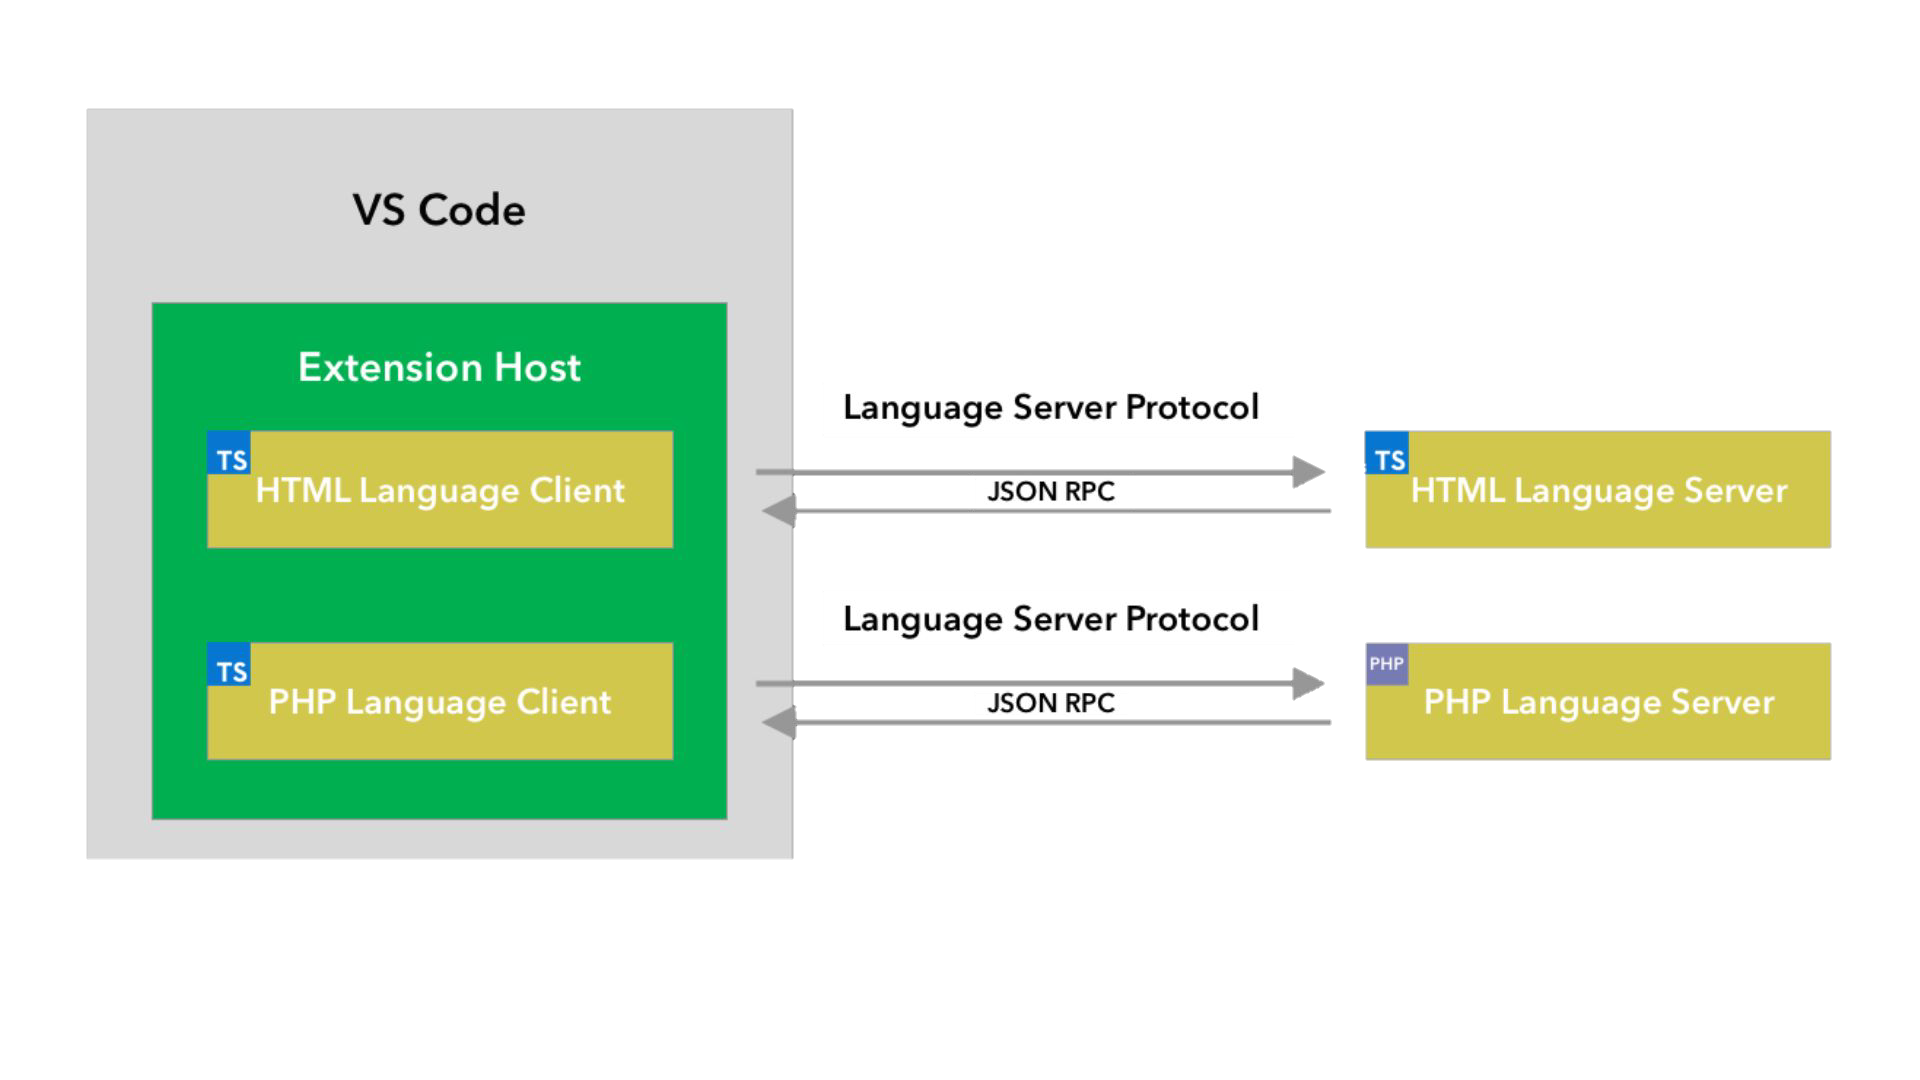
VS Code では、Language Server は 2 つの部分で構成されます。
- Language Client: JavaScript/TypeScript で記述された通常の VS Code 拡張機能。この拡張機能は、すべてのVS Code 名前空間 API にアクセスできます。
- Language Server: 別のプロセスで実行される言語分析ツール。
前述のように、Language Server を別のプロセスで実行することには 2 つの利点があります。
- 分析ツールは、Language Server Protocol に従って Language Client と通信できる限り、どの言語でも実装できます。
- 言語分析ツールは CPU とメモリの使用量が多いことが多いため、別のプロセスで実行することでパフォーマンスコストを回避できます。
ここに、2 つの Language Server 拡張機能を実行している VS Code の図を示します。HTML Language Client および PHP Language Client は、TypeScript で記述された通常の VS Code 拡張機能です。それぞれが対応する Language Server をインスタンス化し、LSP を介してそれらと通信します。PHP Language Server は PHP で記述されていますが、LSP を介して PHP Language Client と通信できます。
このガイドでは、提供されているNode SDK を使用して Language Client / Server を構築する方法を説明します。残りのドキュメントでは、VS Code 拡張機能 API に精通していることを前提としています。
LSP Sample - プレーンテキストファイル用のシンプルな Language Server
プレーンテキストファイル用のオートコンプリートと診断機能を実装するシンプルな Language Server 拡張機能を構築しましょう。また、Client / Server 間の構成の同期についても説明します。
すぐにコードに進みたい場合は
- lsp-sample: このガイドのソースコードに詳細なドキュメントが付いています。
- lsp-multi-server-sample: VS Code のマルチルートワークスペース機能をサポートするために、ワークスペースフォルダーごとに異なるサーバーインスタンスを起動する、
lsp-sampleの詳細なドキュメントが付いた高度なバージョンです。
Microsoft/vscode-extension-samples リポジトリをクローンして、サンプルを開きます。
> git clone https://github.com/microsoft/vscode-extension-samples.git
> cd vscode-extension-samples/lsp-sample
> npm install
> npm run compile
> code .
上記を実行すると、すべての依存関係がインストールされ、クライアントとサーバーの両方のコードを含む lsp-sample ワークスペースが開かれます。lsp-sample の構造の概要を以下に示します。
.
├── client // Language Client
│   ├── src
│   │   ├── test // End to End tests for Language Client / Server
│   │   └── extension.ts // Language Client entry point
├── package.json // The extension manifest
└── server // Language Server
    └── src
        └── server.ts // Language Server entry point
「Language Client」の説明
まず、Language Client の機能を記述する /package.json を見てみましょう。興味深いセクションが 2 つあります。
まず、configuration セクションを見てください。
"configuration": {
    "type": "object",
    "title": "Example configuration",
    "properties": {
        "languageServerExample.maxNumberOfProblems": {
            "scope": "resource",
            "type": "number",
            "default": 100,
            "description": "Controls the maximum number of problems produced by the server."
        }
    }
}
このセクションは、VS Code に configuration 設定を提供します。この例では、これらの設定が起動時および設定の変更ごとに言語サーバーにどのように送信されるかを説明します。
注意: 拡張機能が VS Code バージョン 1.74.0 より前のバージョンと互換性がある場合、
/package.jsonのactivationEventsフィールドにonLanguage:plaintextを宣言して、プレーンテキストファイル(例:.txt拡張子を持つファイル)が開かれるとすぐに拡張機能をアクティブ化するように VS Code に指示する必要があります。"activationEvents": []
実際の Language Client ソースコードと対応する package.json は、/client フォルダーにあります。/client/package.json ファイルの興味深い部分は、engines フィールドを通じて vscode 拡張機能ホスト API を参照し、vscode-languageclient ライブラリに依存関係を追加していることです。
"engines": {
    "vscode": "^1.52.0"
},
"dependencies": {
    "vscode-languageclient": "^7.0.0"
}
前述のように、クライアントは通常の VS Code 拡張機能として実装されており、すべての VS Code 名前空間 API にアクセスできます。
以下は、対応する extension.ts ファイルの内容です。これは lsp-sample 拡張機能のエントリポイントです。
import * as path from 'path';
import { workspace, ExtensionContext } from 'vscode';

import {
  LanguageClient,
  LanguageClientOptions,
  ServerOptions,
  TransportKind
} from 'vscode-languageclient/node';

let client: LanguageClient;

export function activate(context: ExtensionContext) {
  // The server is implemented in node
  let serverModule = context.asAbsolutePath(path.join('server', 'out', 'server.js'));
  // The debug options for the server
  // --inspect=6009: runs the server in Node's Inspector mode so VS Code can attach to the server for debugging
  let debugOptions = { execArgv: ['--nolazy', '--inspect=6009'] };

  // If the extension is launched in debug mode then the debug server options are used
  // Otherwise the run options are used
  let serverOptions: ServerOptions = {
    run: { module: serverModule, transport: TransportKind.ipc },
    debug: {
      module: serverModule,
      transport: TransportKind.ipc,
      options: debugOptions
    }
  };

  // Options to control the language client
  let clientOptions: LanguageClientOptions = {
    // Register the server for plain text documents
    documentSelector: [{ scheme: 'file', language: 'plaintext' }],
    synchronize: {
      // Notify the server about file changes to '.clientrc files contained in the workspace
      fileEvents: workspace.createFileSystemWatcher('**/.clientrc')
    }
  };

  // Create the language client and start the client.
  client = new LanguageClient(
    'languageServerExample',
    'Language Server Example',
    serverOptions,
    clientOptions
  );

  // Start the client. This will also launch the server
  client.start();
}

export function deactivate(): Thenable<void> | undefined {
  if (!client) {
    return undefined;
  }
  return client.stop();
}
「Language Server」の説明
注意: GitHub リポジトリからクローンされた「Server」実装には、最終的なチュートリアル実装が含まれています。チュートリアルに従うには、新しい
server.tsを作成するか、クローンされたバージョンの内容を変更できます。
この例では、サーバーも TypeScript で実装され、Node.js を使用して実行されます。VS Code には既に Node.js ランタイムがバンドルされているため、特定のランタイム要件がない限り、独自のランタイムを提供する必要はありません。
Language Server のソースコードは /server にあります。サーバーの package.json ファイルの興味深いセクションは次のとおりです。
"dependencies": {
    "vscode-languageserver": "^7.0.0",
    "vscode-languageserver-textdocument": "^1.0.1"
}
これにより、vscode-languageserver ライブラリが取り込まれます。
以下は、VS Code からサーバーに差分デルタを常に送信してテキストドキュメントを同期する、提供されているテキストドキュメントマネージャーを使用したサーバー実装です。
import {
  createConnection,
  TextDocuments,
  Diagnostic,
  DiagnosticSeverity,
  ProposedFeatures,
  InitializeParams,
  DidChangeConfigurationNotification,
  CompletionItem,
  CompletionItemKind,
  TextDocumentPositionParams,
  TextDocumentSyncKind,
  InitializeResult
} from 'vscode-languageserver/node';

import { TextDocument } from 'vscode-languageserver-textdocument';

// Create a connection for the server, using Node's IPC as a transport.
// Also include all preview / proposed LSP features.
let connection = createConnection(ProposedFeatures.all);

// Create a simple text document manager.
let documents: TextDocuments<TextDocument> = new TextDocuments(TextDocument);

let hasConfigurationCapability: boolean = false;
let hasWorkspaceFolderCapability: boolean = false;
let hasDiagnosticRelatedInformationCapability: boolean = false;

connection.onInitialize((params: InitializeParams) => {
  let capabilities = params.capabilities;

  // Does the client support the `workspace/configuration` request?
  // If not, we fall back using global settings.
  hasConfigurationCapability = !!(
    capabilities.workspace && !!capabilities.workspace.configuration
  );
  hasWorkspaceFolderCapability = !!(
    capabilities.workspace && !!capabilities.workspace.workspaceFolders
  );
  hasDiagnosticRelatedInformationCapability = !!(
    capabilities.textDocument &&
    capabilities.textDocument.publishDiagnostics &&
    capabilities.textDocument.publishDiagnostics.relatedInformation
  );

  const result: InitializeResult = {
    capabilities: {
      textDocumentSync: TextDocumentSyncKind.Incremental,
      // Tell the client that this server supports code completion.
      completionProvider: {
        resolveProvider: true
      }
    }
  };
  if (hasWorkspaceFolderCapability) {
    result.capabilities.workspace = {
      workspaceFolders: {
        supported: true
      }
    };
  }
  return result;
});

connection.onInitialized(() => {
  if (hasConfigurationCapability) {
    // Register for all configuration changes.
    connection.client.register(DidChangeConfigurationNotification.type, undefined);
  }
  if (hasWorkspaceFolderCapability) {
    connection.workspace.onDidChangeWorkspaceFolders(_event => {
      connection.console.log('Workspace folder change event received.');
    });
  }
});

// The example settings
interface ExampleSettings {
  maxNumberOfProblems: number;
}

// The global settings, used when the `workspace/configuration` request is not supported by the client.
// Please note that this is not the case when using this server with the client provided in this example
// but could happen with other clients.
const defaultSettings: ExampleSettings = { maxNumberOfProblems: 1000 };
let globalSettings: ExampleSettings = defaultSettings;

// Cache the settings of all open documents
let documentSettings: Map<string, Thenable<ExampleSettings>> = new Map();

connection.onDidChangeConfiguration(change => {
  if (hasConfigurationCapability) {
    // Reset all cached document settings
    documentSettings.clear();
  } else {
    globalSettings = <ExampleSettings>(
      (change.settings.languageServerExample || defaultSettings)
    );
  }

  // Revalidate all open text documents
  documents.all().forEach(validateTextDocument);
});

function getDocumentSettings(resource: string): Thenable<ExampleSettings> {
  if (!hasConfigurationCapability) {
    return Promise.resolve(globalSettings);
  }
  let result = documentSettings.get(resource);
  if (!result) {
    result = connection.workspace.getConfiguration({
      scopeUri: resource,
      section: 'languageServerExample'
    });
    documentSettings.set(resource, result);
  }
  return result;
}

// Only keep settings for open documents
documents.onDidClose(e => {
  documentSettings.delete(e.document.uri);
});

// The content of a text document has changed. This event is emitted
// when the text document first opened or when its content has changed.
documents.onDidChangeContent(change => {
  validateTextDocument(change.document);
});

async function validateTextDocument(textDocument: TextDocument): Promise<void> {
  // In this simple example we get the settings for every validate run.
  let settings = await getDocumentSettings(textDocument.uri);

  // The validator creates diagnostics for all uppercase words length 2 and more
  let text = textDocument.getText();
  let pattern = /\b[A-Z]{2,}\b/g;
  let m: RegExpExecArray | null;

  let problems = 0;
  let diagnostics: Diagnostic[] = [];
  while ((m = pattern.exec(text)) && problems < settings.maxNumberOfProblems) {
    problems++;
    let diagnostic: Diagnostic = {
      severity: DiagnosticSeverity.Warning,
      range: {
        start: textDocument.positionAt(m.index),
        end: textDocument.positionAt(m.index + m[0].length)
      },
      message: `${m[0]} is all uppercase.`,
      source: 'ex'
    };
    if (hasDiagnosticRelatedInformationCapability) {
      diagnostic.relatedInformation = [
        {
          location: {
            uri: textDocument.uri,
            range: Object.assign({}, diagnostic.range)
          },
          message: 'Spelling matters'
        },
        {
          location: {
            uri: textDocument.uri,
            range: Object.assign({}, diagnostic.range)
          },
          message: 'Particularly for names'
        }
      ];
    }
    diagnostics.push(diagnostic);
  }

  // Send the computed diagnostics to VS Code.
  connection.sendDiagnostics({ uri: textDocument.uri, diagnostics });
}

connection.onDidChangeWatchedFiles(_change => {
  // Monitored files have change in VS Code
  connection.console.log('We received a file change event');
});

// This handler provides the initial list of the completion items.
connection.onCompletion(
  (_textDocumentPosition: TextDocumentPositionParams): CompletionItem[] => {
    // The pass parameter contains the position of the text document in
    // which code complete got requested. For the example we ignore this
    // info and always provide the same completion items.
    return [
      {
        label: 'TypeScript',
        kind: CompletionItemKind.Text,
        data: 1
      },
      {
        label: 'JavaScript',
        kind: CompletionItemKind.Text,
        data: 2
      }
    ];
  }
);

// This handler resolves additional information for the item selected in
// the completion list.
connection.onCompletionResolve(
  (item: CompletionItem): CompletionItem => {
    if (item.data === 1) {
      item.detail = 'TypeScript details';
      item.documentation = 'TypeScript documentation';
    } else if (item.data === 2) {
      item.detail = 'JavaScript details';
      item.documentation = 'JavaScript documentation';
    }
    return item;
  }
);

// Make the text document manager listen on the connection
// for open, change and close text document events
documents.listen(connection);

// Listen on the connection
connection.listen();
シンプルな検証の追加
ドキュメント検証をサーバーに追加するには、テキストドキュメントマネージャーにリスナーを追加します。これは、テキストドキュメントの内容が変更されるたびに呼び出されます。ドキュメントを検証するのに最適なタイミングを決定するのはサーバーの役割です。例示的な実装では、サーバーはプレーンテキストドキュメントを検証し、すべて大文字の単語のすべての出現箇所をフラグ付けします。対応するコードスニペットは次のようになります。
// The content of a text document has changed. This event is emitted
// when the text document first opened or when its content has changed.
documents.onDidChangeContent(async change => {
  let textDocument = change.document;
  // In this simple example we get the settings for every validate run.
  let settings = await getDocumentSettings(textDocument.uri);

  // The validator creates diagnostics for all uppercase words length 2 and more
  let text = textDocument.getText();
  let pattern = /\b[A-Z]{2,}\b/g;
  let m: RegExpExecArray | null;

  let problems = 0;
  let diagnostics: Diagnostic[] = [];
  while ((m = pattern.exec(text)) && problems < settings.maxNumberOfProblems) {
    problems++;
    let diagnostic: Diagnostic = {
      severity: DiagnosticSeverity.Warning,
      range: {
        start: textDocument.positionAt(m.index),
        end: textDocument.positionAt(m.index + m[0].length)
      },
      message: `${m[0]} is all uppercase.`,
      source: 'ex'
    };
    if (hasDiagnosticRelatedInformationCapability) {
      diagnostic.relatedInformation = [
        {
          location: {
            uri: textDocument.uri,
            range: Object.assign({}, diagnostic.range)
          },
          message: 'Spelling matters'
        },
        {
          location: {
            uri: textDocument.uri,
            range: Object.assign({}, diagnostic.range)
          },
          message: 'Particularly for names'
        }
      ];
    }
    diagnostics.push(diagnostic);
  }

  // Send the computed diagnostics to VS Code.
  connection.sendDiagnostics({ uri: textDocument.uri, diagnostics });
});
診断のヒントとコツ
- 開始位置と終了位置が同じ場合、VS Code はその位置の単語を波線で下線表示します。
- 行末まで波線で下線表示したい場合は、終了位置の文字を Number.MAX_VALUE に設定してください。
Language Server を実行するには、次の手順を実行します。
- ⇧⌘B (Windows, Linux Ctrl+Shift+B) を押してビルドタスクを開始します。このタスクは、クライアントとサーバーの両方をコンパイルします。
- Run ビューを開き、Launch Client 起動構成を選択し、Start Debugging ボタンを押して、拡張機能コードを実行する追加の Extension Development Host インスタンスを起動します。
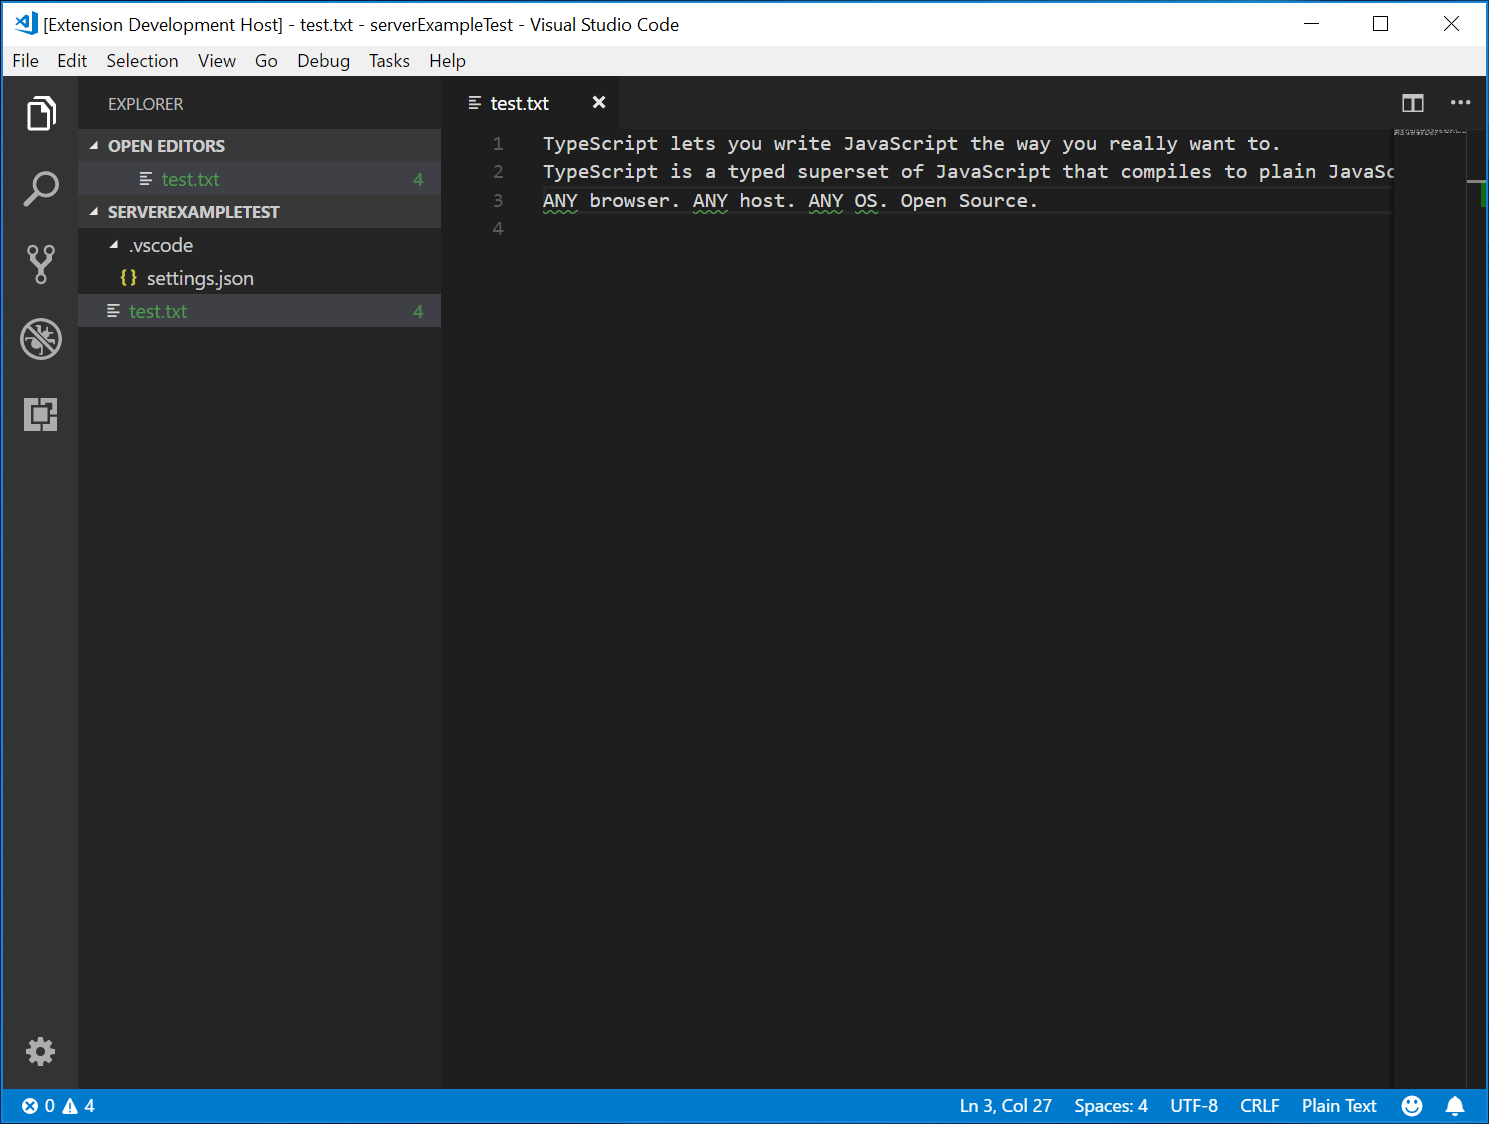
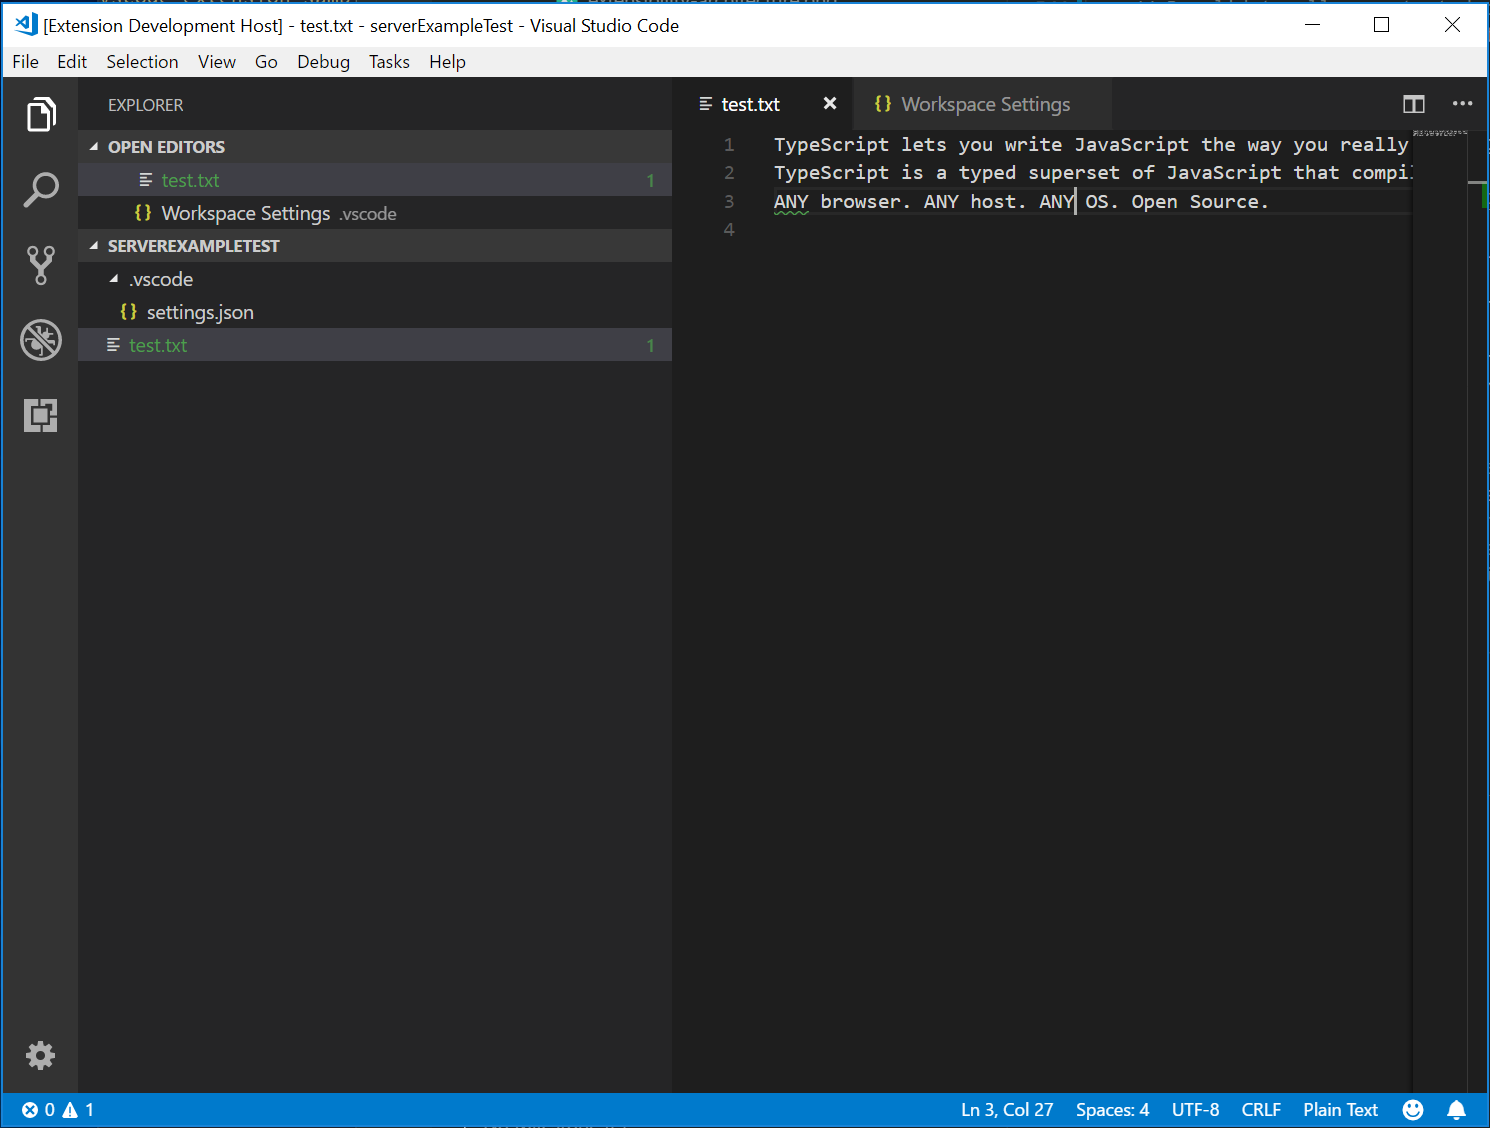
- ルートフォルダーに
test.txtファイルを作成し、次の内容を貼り付けます。
TypeScript lets you write JavaScript the way you really want to.
TypeScript is a typed superset of JavaScript that compiles to plain JavaScript.
ANY browser. ANY host. ANY OS. Open Source.
すると、Extension Development Host インスタンスは次のようになります。
クライアントとサーバーの両方のデバッグ
クライアントコードのデバッグは、通常の拡張機能のデバッグと同じくらい簡単です。クライアントコードにブレークポイントを設定し、F5 を押して拡張機能をデバッグします。

サーバーは拡張機能(クライアント)で実行されている LanguageClient によって起動されるため、実行中のサーバーにデバッガーをアタッチする必要があります。これを行うには、Run and Debug ビューに切り替えて、起動構成 Attach to Server を選択し、F5 を押します。これにより、デバッガーがサーバーにアタッチされます。

Language Server のロギングサポート
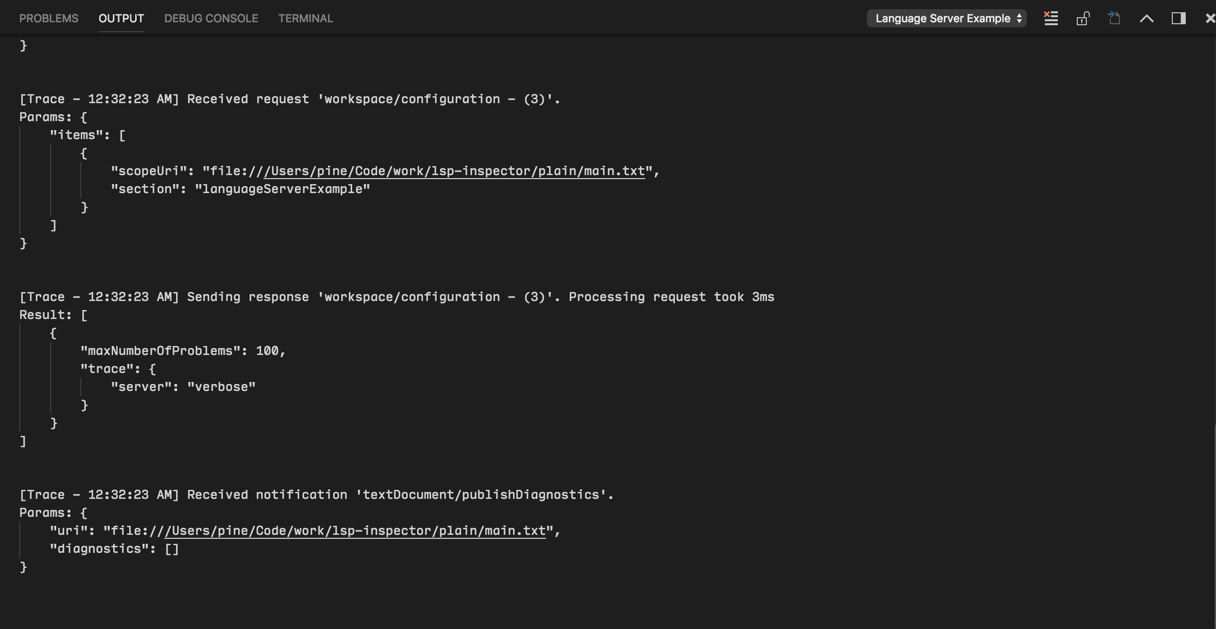
クライアントを実装するために vscode-languageclient を使用している場合、クライアントが name のチャネルに Language Client / Server 間の通信を記録するように指示する設定 [langId].trace.server を指定できます。
lsp-sample の場合、この設定を "languageServerExample.trace.server": "verbose" に設定できます。次に、「Language Server Example」チャネルに移動します。ログが表示されるはずです。
サーバーでの設定の使用
拡張機能のクライアント部分を記述する際に、報告される問題の最大数を制御する設定を既に定義しました。また、サーバー側でこれらの設定をクライアントから読み取るコードも記述しました。
function getDocumentSettings(resource: string): Thenable<ExampleSettings> {
  if (!hasConfigurationCapability) {
    return Promise.resolve(globalSettings);
  }
  let result = documentSettings.get(resource);
  if (!result) {
    result = connection.workspace.getConfiguration({
      scopeUri: resource,
      section: 'languageServerExample'
    });
    documentSettings.set(resource, result);
  }
  return result;
}
サーバー側で設定の変更をリッスンし、設定が変更された場合は、開いているテキストドキュメントを再検証するだけで済みます。ドキュメント変更イベント処理の検証ロジックを再利用できるように、コードを validateTextDocument 関数に抽出し、コードを変更して maxNumberOfProblems 変数を尊重するようにします。
async function validateTextDocument(textDocument: TextDocument): Promise<void> {
  // In this simple example we get the settings for every validate run.
  let settings = await getDocumentSettings(textDocument.uri);

  // The validator creates diagnostics for all uppercase words length 2 and more
  let text = textDocument.getText();
  let pattern = /\b[A-Z]{2,}\b/g;
  let m: RegExpExecArray | null;

  let problems = 0;
  let diagnostics: Diagnostic[] = [];
  while ((m = pattern.exec(text)) && problems < settings.maxNumberOfProblems) {
    problems++;
    let diagnostic: Diagnostic = {
      severity: DiagnosticSeverity.Warning,
      range: {
        start: textDocument.positionAt(m.index),
        end: textDocument.positionAt(m.index + m[0].length)
      },
      message: `${m[0]} is all uppercase.`,
      source: 'ex'
    };
    if (hasDiagnosticRelatedInformationCapability) {
      diagnostic.relatedInformation = [
        {
          location: {
            uri: textDocument.uri,
            range: Object.assign({}, diagnostic.range)
          },
          message: 'Spelling matters'
        },
        {
          location: {
            uri: textDocument.uri,
            range: Object.assign({}, diagnostic.range)
          },
          message: 'Particularly for names'
        }
      ];
    }
    diagnostics.push(diagnostic);
  }

  // Send the computed diagnostics to VS Code.
  connection.sendDiagnostics({ uri: textDocument.uri, diagnostics });
}
設定変更の処理は、接続に設定変更の通知ハンドラーを追加することによって行われます。対応するコードは次のようになります。
connection.onDidChangeConfiguration(change => {
  if (hasConfigurationCapability) {
    // Reset all cached document settings
    documentSettings.clear();
  } else {
    globalSettings = <ExampleSettings>(
      (change.settings.languageServerExample || defaultSettings)
    );
  }

  // Revalidate all open text documents
  documents.all().forEach(validateTextDocument);
});
クライアントを再度起動し、設定を最大 1 つの問題を報告するように変更すると、次の検証結果になります。
追加の言語機能の追加
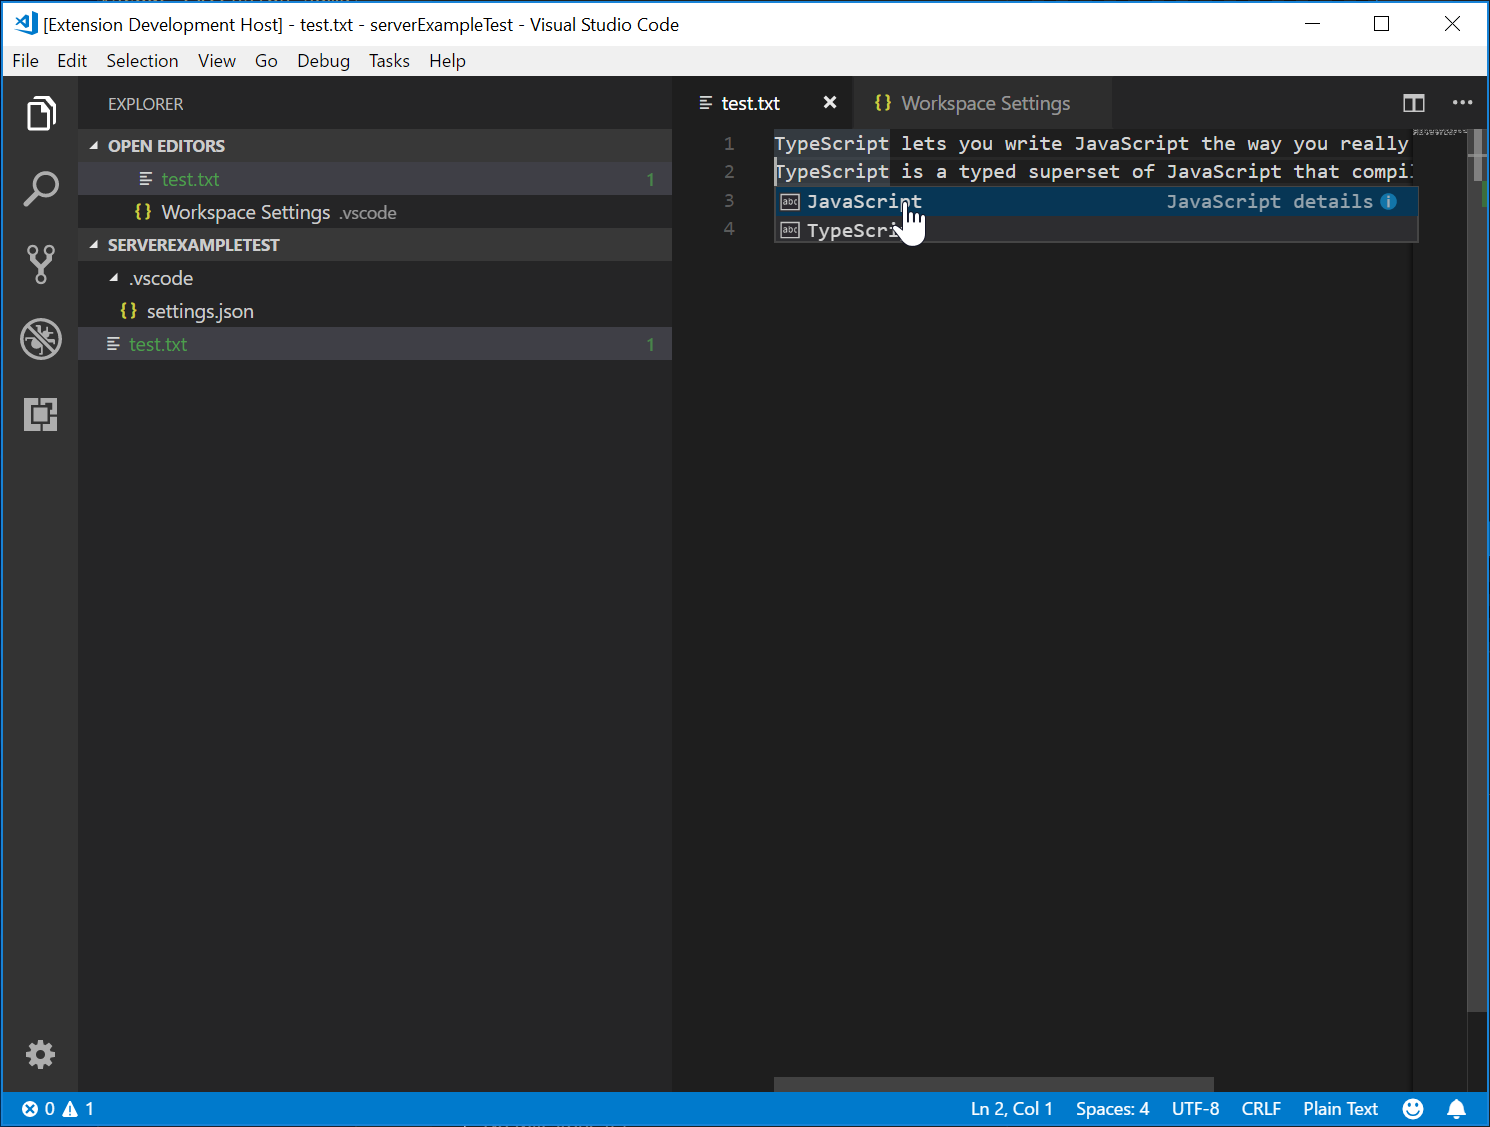
言語サーバーが通常実装する最初の興味深い機能は、ドキュメントの検証です。その意味で、リンターも言語サーバーと見なすことができ、VS Code ではリンターは通常言語サーバーとして実装されます(例として eslint および jshint を参照)。しかし、言語サーバーにはそれ以上のものがあります。コード補完、すべての参照の検索、定義への移動などを提供できます。以下の例コードは、サーバーにコード補完を追加します。これは、「TypeScript」と「JavaScript」の 2 つの単語を提案します。
// This handler provides the initial list of the completion items.
connection.onCompletion(
  (_textDocumentPosition: TextDocumentPositionParams): CompletionItem[] => {
    // The pass parameter contains the position of the text document in
    // which code complete got requested. For the example we ignore this
    // info and always provide the same completion items.
    return [
      {
        label: 'TypeScript',
        kind: CompletionItemKind.Text,
        data: 1
      },
      {
        label: 'JavaScript',
        kind: CompletionItemKind.Text,
        data: 2
      }
    ];
  }
);

// This handler resolves additional information for the item selected in
// the completion list.
connection.onCompletionResolve(
  (item: CompletionItem): CompletionItem => {
    if (item.data === 1) {
      item.detail = 'TypeScript details';
      item.documentation = 'TypeScript documentation';
    } else if (item.data === 2) {
      item.detail = 'JavaScript details';
      item.documentation = 'JavaScript documentation';
    }
    return item;
  }
);
data フィールドは、resolve ハンドラーで補完項目を一意に識別するために使用されます。data プロパティはプロトコルに対して透過的です。基になるメッセージングプロトコルは JSON ベースであるため、data フィールドには JSON にシリアライズおよびデシリアライズできるデータのみを含める必要があります。
残りは、サーバーがコード補完要求をサポートしていることを VS Code に伝えることです。これを行うには、初期化ハンドラーで対応する機能をフラグ付けします。
connection.onInitialize((params): InitializeResult => {
    ...
    return {
        capabilities: {
            ...
            // Tell the client that the server supports code completion
            completionProvider: {
                resolveProvider: true
            }
        }
    };
});
以下のスクリーンショットは、プレーンテキストファイルで実行されている完了したコードを示しています。
Language Server のテスト
高品質な Language Server を作成するには、その機能を網羅する優れたテストスイートを構築する必要があります。Language Server をテストする一般的な方法は 2 つあります。
- 単体テスト: これは、Language Server に送信されるすべての情報をモックアップして、特定の機能をテストしたい場合に便利です。VS Code の HTML / CSS / JSON Language Server は、このアプローチでテストされます。LSP npm モジュールもこのアプローチを使用しています。npm プロトコルモジュールを使用して記述された単体テストの例については、こちらを参照してください。
- エンドツーエンドテスト: これはVS Code 拡張機能テストに似ています。このアプローチの利点は、ワークスペースを持つ VS Code インスタンスをインスタンス化し、ファイルを開き、Language Client / Server をアクティブ化し、VS Code コマンドを実行してテストを実行することです。このアプローチは、モックアップが困難または不可能なファイル、設定、または依存関係(
node_modulesなど)がある場合に優れています。人気のPython 拡張機能は、このアプローチでテストしています。
単体テストは、好みのテストフレームワークで実行できます。ここでは、Language Server 拡張機能のエンドツーエンドテストの方法を説明します。
.vscode/launch.json を開き、E2E テストターゲットを見つけます。
{
  "name": "Language Server E2E Test",
  "type": "extensionHost",
  "request": "launch",
  "runtimeExecutable": "${execPath}",
  "args": [
    "--extensionDevelopmentPath=${workspaceRoot}",
    "--extensionTestsPath=${workspaceRoot}/client/out/test/index",
    "${workspaceRoot}/client/testFixture"
  ],
  "outFiles": ["${workspaceRoot}/client/out/test/**/*.js"]
}
このデバッグターゲットを実行すると、client/testFixture をアクティブなワークスペースとして VS Code インスタンスが起動されます。次に VS Code は、client/src/test のすべてのテストを実行します。デバッグのヒントとして、client/src/test の TypeScript ファイルにブレークポイントを設定すると、ヒットします。
completion.test.ts ファイルを見てみましょう。
import * as vscode from 'vscode';
import * as assert from 'assert';
import { getDocUri, activate } from './helper';

suite('Should do completion', () => {
  const docUri = getDocUri('completion.txt');

  test('Completes JS/TS in txt file', async () => {
    await testCompletion(docUri, new vscode.Position(0, 0), {
      items: [
        { label: 'JavaScript', kind: vscode.CompletionItemKind.Text },
        { label: 'TypeScript', kind: vscode.CompletionItemKind.Text }
      ]
    });
  });
});

async function testCompletion(
  docUri: vscode.Uri,
  position: vscode.Position,
  expectedCompletionList: vscode.CompletionList
) {
  await activate(docUri);

  // Executing the command `vscode.executeCompletionItemProvider` to simulate triggering completion
  const actualCompletionList = (await vscode.commands.executeCommand(
    'vscode.executeCompletionItemProvider',
    docUri,
    position
  )) as vscode.CompletionList;

  assert.ok(actualCompletionList.items.length >= 2);
  expectedCompletionList.items.forEach((expectedItem, i) => {
    const actualItem = actualCompletionList.items[i];
    assert.equal(actualItem.label, expectedItem.label);
    assert.equal(actualItem.kind, expectedItem.kind);
  });
}
このテストでは、次のことを行います。
- 拡張機能をアクティブ化します。
vscode.executeCompletionItemProviderコマンドを URI と位置で実行して、補完トリガーをシミュレートします。- 返された補完項目を期待される補完項目に対してアサートします。
activate(docURI) 関数について詳しく見てみましょう。これは client/src/test/helper.ts で定義されています。
import * as vscode from 'vscode';
import * as path from 'path';

export let doc: vscode.TextDocument;
export let editor: vscode.TextEditor;
export let documentEol: string;
export let platformEol: string;

/**
 * Activates the vscode.lsp-sample extension
 */
export async function activate(docUri: vscode.Uri) {
  // The extensionId is `publisher.name` from package.json
  const ext = vscode.extensions.getExtension('vscode-samples.lsp-sample')!;
  await ext.activate();
  try {
    doc = await vscode.workspace.openTextDocument(docUri);
    editor = await vscode.window.showTextDocument(doc);
    await sleep(2000); // Wait for server activation
  } catch (e) {
    console.error(e);
  }
}

async function sleep(ms: number) {
  return new Promise(resolve => setTimeout(resolve, ms));
}
アクティブ化部分では、次のことを行います。
package.jsonで定義されている{publisher.name}.{extensionId}を使用して拡張機能を取得します。- 指定されたドキュメントを開き、アクティブなテキストエディターに表示します。
- 2 秒間スリープして、Language Server がインスタンス化されていることを確認します。
準備ができたら、各言語機能に対応するVS Code コマンドを実行し、返された結果に対してアサートできます。
実装したばかりの診断機能をカバーするテストがもう 1 つあります。client/src/test/diagnostics.test.ts で確認してください。
高度なトピック
これまでのところ、このガイドでは次のことをカバーしました。
- Language Server および Language Server Protocol の概要。
- VS Code における Language Server 拡張機能のアーキテクチャ。
- lsp-sample 拡張機能、およびその開発/デバッグ/検査/テスト方法。
このガイドに含められなかった、さらに高度なトピックがいくつかあります。Language Server 開発のさらなる学習のために、これらのリソースへのリンクを含めます。
追加の Language Server 機能
コード補完に加えて、現在 Language Server でサポートされている言語機能は次のとおりです。
- ドキュメントハイライト: テキストドキュメント内のすべての 'equal' シンボルをハイライトします。
- ホバー: テキストドキュメントで選択されたシンボルのホバー情報を提供します。
- シグネチャヘルプ: テキストドキュメントで選択されたシンボルのシグネチャヘルプを提供します。
- 定義へ移動: テキストドキュメントで選択されたシンボルの定義へ移動サポートを提供します。
- 型定義へ移動: テキストドキュメントで選択されたシンボルの型/インターフェース定義へ移動サポートを提供します。
- 実装へ移動: テキストドキュメントで選択されたシンボルの実装定義へ移動サポートを提供します。
- 参照の検索: テキストドキュメントで選択されたシンボルのプロジェクト全体の参照をすべて検索します。
- ドキュメントシンボルのリスト: テキストドキュメントで定義されているすべてのシンボルをリストします。
- ワークスペースシンボルのリスト: プロジェクト全体のすべてのシンボルをリストします。
- コードアクション: 指定されたテキストドキュメントと範囲に対して実行するコマンド(通常は整形/リファクタリング)を計算します。
- CodeLens: 指定されたテキストドキュメントの CodeLens 統計を計算します。
- ドキュメントフォーマット: ドキュメント全体、ドキュメント範囲のフォーマット、および入力時のフォーマットが含まれます。
- 名前変更: プロジェクト全体でシンボルの名前を変更します。
- ドキュメントリンク: ドキュメント内のリンクを計算および解決します。
- ドキュメントの色: ドキュメント内の色を計算および解決し、エディターにカラーピッカーを提供します。
「プログラムによる言語機能」トピックでは、上記の各言語機能について説明し、Language Server Protocol を使用するか、拡張機能から直接拡張 API を使用して実装する方法についてガイダンスを提供します。
インクリメンタルテキストドキュメント同期
この例では、vscode-languageserver モジュールによって提供されるシンプルなテキストドキュメントマネージャーを使用して、VS Code と Language Server 間のドキュメントを同期します。
これには 2 つの欠点があります。
- テキストドキュメントのコンテンツ全体がサーバーに繰り返し送信されるため、大量のデータが転送されます。
- 既存の言語ライブラリを使用する場合、そのようなライブラリは通常、不要な解析と抽象構文ツリーの作成を回避するために、インクリメンタルドキュメント更新をサポートしています。
したがって、プロトコルはインクリメンタルドキュメント同期もサポートしています。
インクリメンタルドキュメント同期を利用するために、サーバーは 3 つの通知ハンドラーをインストールする必要があります。
- onDidOpenTextDocument: テキストドキュメントが VS Code で開かれたときに呼び出されます。
- onDidChangeTextDocument: テキストドキュメントのコンテンツが VS Code で変更されたときに呼び出されます。
- onDidCloseTextDocument: テキストドキュメントが VS Code で閉じられたときに呼び出されます。
以下は、これらの通知ハンドラーを接続にフックする方法と、初期化時に正しい機能を返す方法を示すコードスニペットです。
connection.onInitialize((params): InitializeResult => {
    ...
    return {
        capabilities: {
            // Enable incremental document sync
            textDocumentSync: TextDocumentSyncKind.Incremental,
            ...
        }
    };
});

connection.onDidOpenTextDocument((params) => {
    // A text document was opened in VS Code.
    // params.uri uniquely identifies the document. For documents stored on disk, this is a file URI.
    // params.text the initial full content of the document.
});

connection.onDidChangeTextDocument((params) => {
    // The content of a text document has change in VS Code.
    // params.uri uniquely identifies the document.
    // params.contentChanges describe the content changes to the document.
});

connection.onDidCloseTextDocument((params) => {
    // A text document was closed in VS Code.
    // params.uri uniquely identifies the document.
});

/*
Make the text document manager listen on the connection
for open, change and close text document events.

Comment out this line to allow `connection.onDidOpenTextDocument`,
`connection.onDidChangeTextDocument`, and `connection.onDidCloseTextDocument` to handle the events
*/
// documents.listen(connection);
VS Code API を直接使用して言語機能を実装する
Language Server には多くの利点がありますが、VS Code の編集機能を拡張するための唯一の選択肢ではありません。ドキュメントのタイプに対して単純な言語機能を追加したい場合は、vscode.languages.register[LANGUAGE_FEATURE]Provider をオプションとして検討してください。
以下は、プレーンテキストファイル用の補完としていくつかのスニペットを追加するために vscode.languages.registerCompletionItemProvider を使用したcompletions-sample です。
VS Code API の使用方法を示すその他のサンプルは、https://github.com/microsoft/vscode-extension-samples にあります。
Language Server 用のエラー許容パーサー
ほとんどの場合、エディター内のコードは不完全で構文的に正しくありませんが、開発者はオートコンプリートやその他の言語機能が機能することを期待します。したがって、Language Server にはエラー許容パーサーが必要です。パーサーは部分的に完成したコードから意味のある AST を生成し、Language Server は AST に基づいて言語機能を提供します。
VS Code で PHP サポートを改善していたとき、公式の PHP パーサーはエラー許容ではなく、Language Server で直接再利用できないことに気づきました。そのため、Microsoft/tolerant-php-parser を開発し、エラー許容パーサーを実装する必要がある Language Server 作成者に役立つ可能性のある詳細なメモを残しました。
よくある質問
サーバーにアタッチしようとすると、「ランタイムプロセスに接続できません(5000 ms 後にタイムアウト)」というエラーが表示されますか?
デバッガーをアタッチしようとしたときにサーバーが実行されていない場合、このタイムアウトエラーが表示されます。クライアントが言語サーバーを起動するため、実行中のサーバーがあることを確認するには、クライアントを起動してください。クライアントのブレークポイントがサーバーの起動を妨げている場合は、無効にする必要がある場合もあります。
このガイドとLSP 仕様を読みましたが、まだ未解決の質問があります。どこで助けを得られますか?
https://github.com/microsoft/language-server-protocol で issue を開いてください。