チュートリアル:Language Model API を使用した AI コード注釈の生成
このチュートリアルでは、AI パワードのコードチューターを構築するための VS Code 拡張機能の作成方法を学びます。Language Model (LM) API を使用してコードを改善するための提案を生成し、VS Code 拡張機能 API を活用して、ユーザーがホバーして詳細を確認できるインライン注釈としてエディタにシームレスに統合します。このチュートリアルを完了すると、VS Code にカスタム AI 機能を実装する方法がわかります。
前提条件
このチュートリアルを完了するには、以下のツールとアカウントが必要です。
拡張機能の足場を構築する
まず、Yeoman と VS Code Extension Generator を使用して、開発準備ができた TypeScript または JavaScript プロジェクトの足場を構築します。
npx --package yo --package generator-code -- yo code
新しい拡張機能ウィザードを完了するには、次のオプションを選択してください...
# ? What type of extension do you want to create? New Extension (TypeScript)
# ? What's the name of your extension? Code Tutor

### Press <Enter> to choose default for all options below ###

# ? What's the identifier of your extension? code-tutor
# ? What's the description of your extension? LEAVE BLANK
# ? Initialize a git repository? Yes
# ? Bundle the source code with webpack? No
# ? Which package manager to use? npm

# ? Do you want to open the new folder with Visual Studio Code? Open with `code`
package.json ファイルを編集して正しいコマンドを含める
足場として構築されたプロジェクトには、package.json ファイルに 1 つの "helloWorld" コマンドが含まれています。このコマンドは、拡張機能がインストールされたときにコマンドパレットに表示されるものです。
"contributes": {
  "commands": [
      {
      "command": "code-tutor.helloWorld",
      "title": "Hello World"
      }
  ]
}
コードチューター拡張機能を構築し、行に注釈を追加するため、ユーザーがこれらの注釈をオン/オフできるようにするコマンドが必要です。command と title プロパティを更新します。
"contributes": {
  "commands": [
      {
      "command": "code-tutor.annotate",
      "title": "Toggle Tutor Annotations"
      }
  ]
}
package.json は拡張機能のコマンドと UI 要素を定義しますが、src/extension.ts ファイルは、これらのコマンドに対して実行されるコードを記述する場所です。
src/extension.ts ファイルを開き、registerCommand メソッドを package.json ファイルの command プロパティと一致するように変更します。
const disposable = vscode.commands.registerCommand('code-tutor.annotate', () => {
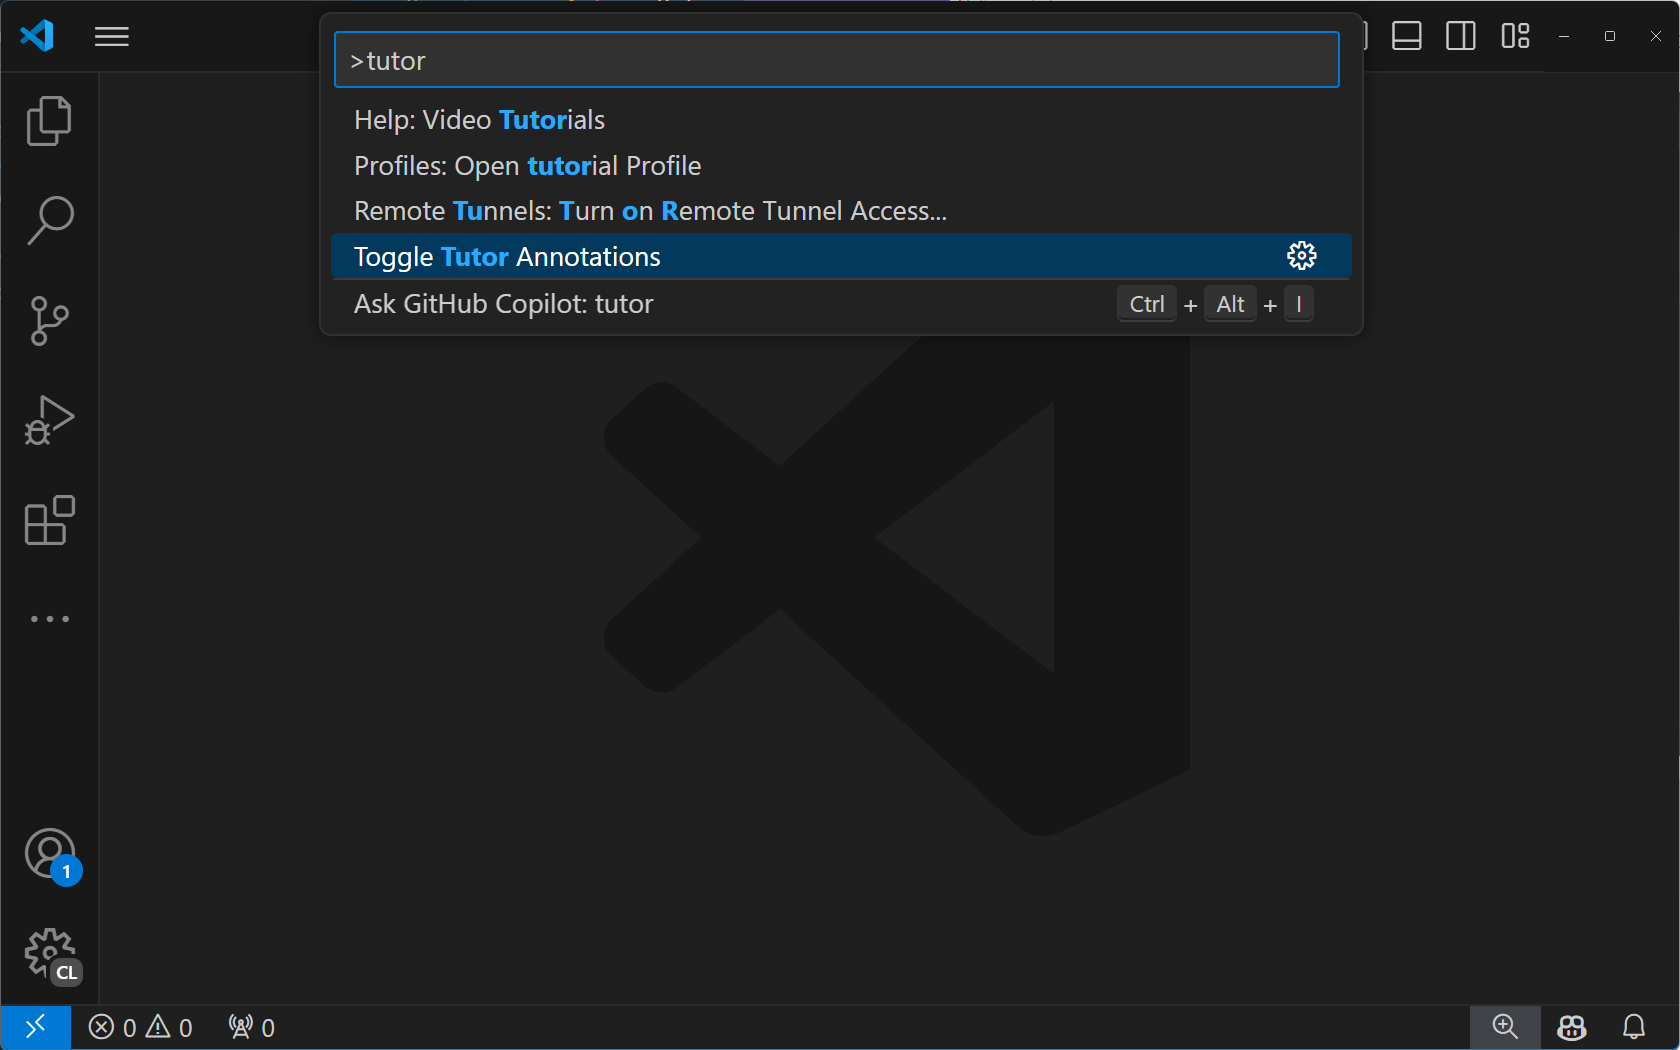
F5 キーを押して拡張機能を実行します。これにより、拡張機能がインストールされた新しい VS Code インスタンスが開きます。コマンドパレットを ⇧⌘P (Windows, Linux Ctrl+Shift+P) で開き、「tutor」を検索します。「Tutor Annotations」コマンドが表示されるはずです。
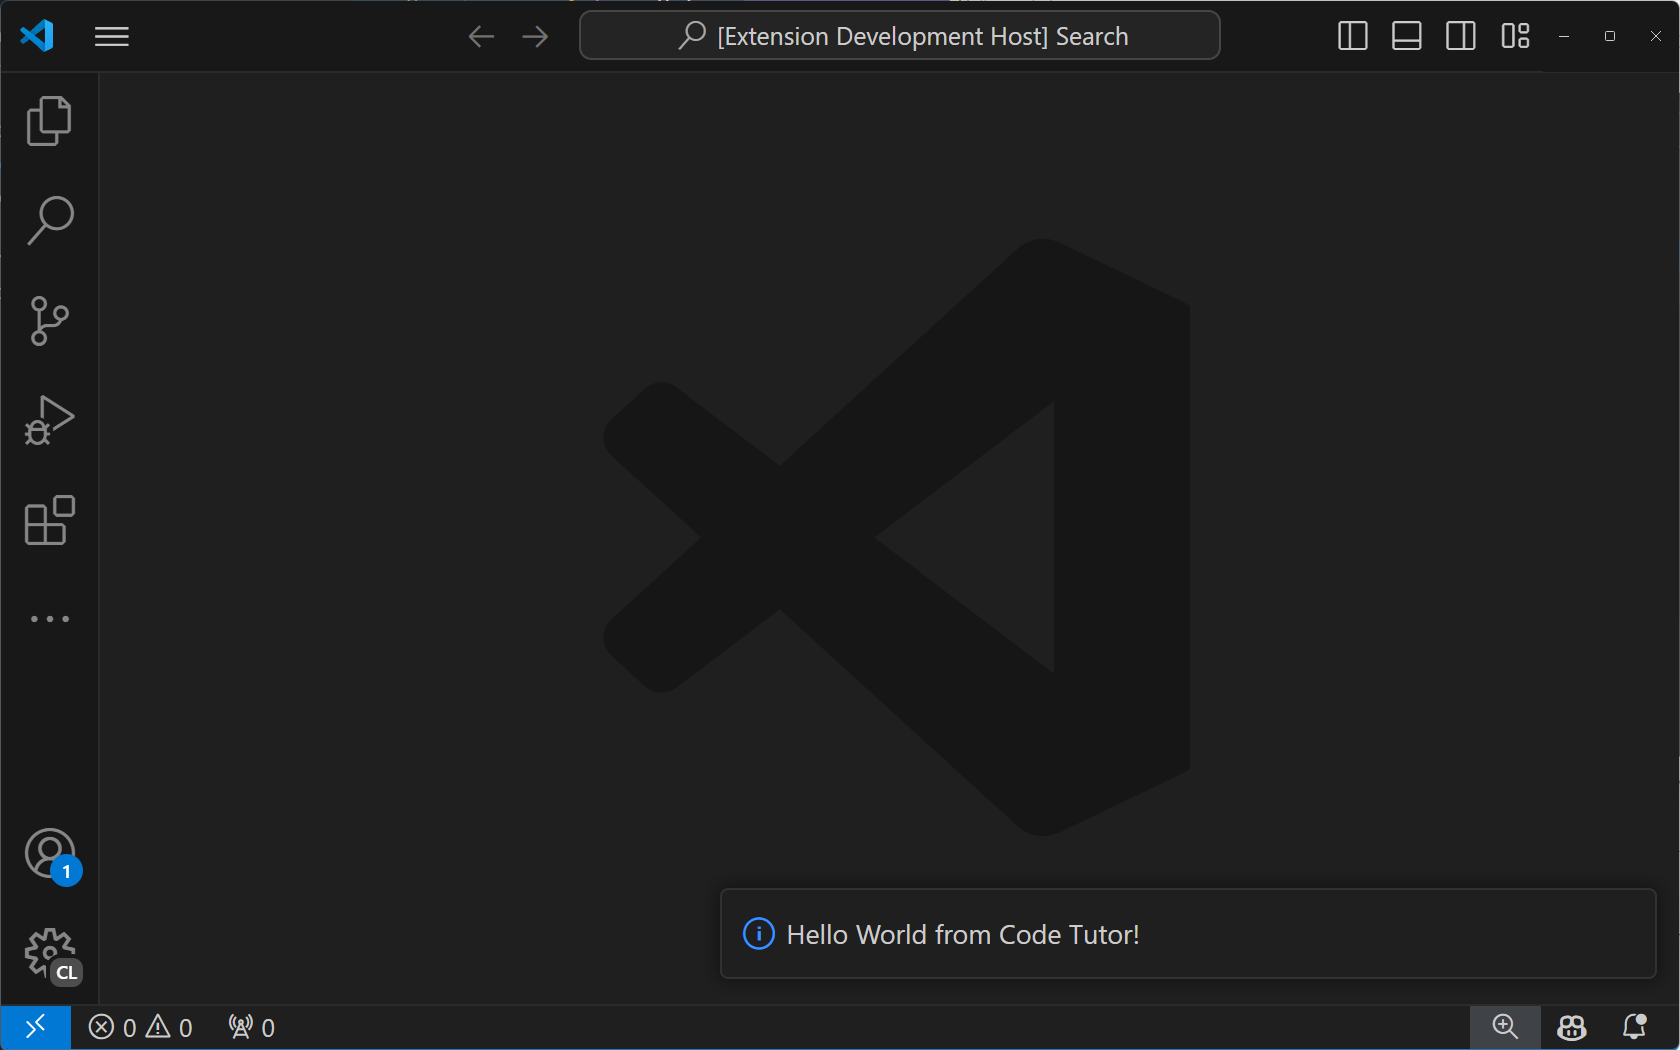
「Tutor Annotations」コマンドを選択すると、「Hello World」通知メッセージが表示されます。
「annotate」コマンドを実装する
コードチューターの注釈を機能させるには、コードを送信して注釈を提供するように依頼する必要があります。これを 3 つのステップで行います。
- 開いている現在のタブのコードを行番号とともに取得します。
- そのコードを Language Model API に送信し、注釈の提供方法を指示するカスタムプロンプトを渡します。
- 注釈を解析してエディタに表示します。
ステップ 1:行番号付きのコードを取得する
現在のタブからコードを取得するには、ユーザーが開いているタブへの参照が必要です。これは、registerCommand メソッドを registerTextEditorCommand に変更することで取得できます。これら 2 つのコマンドの違いは、後者によって、TextEditor と呼ばれるユーザーが開いているタブへの参照が取得できることです。
const disposable = vscode.commands.registerTextEditorCommand('code-tutor.annotate', async (textEditor: vscode.TextEditor) => {
これで、textEditor 参照を使用して、「表示可能なエディタ空間」内のすべてのコードを取得できます。これは画面に表示されるコードです。表示可能なエディタ空間の上または下にあるコードは含まれません。
extension.ts ファイルの末尾にある export function deactivate() { } 行のすぐ上に、次のメソッドを追加します。
function getVisibleCodeWithLineNumbers(textEditor: vscode.TextEditor) {
  // get the position of the first and last visible lines
  let currentLine = textEditor.visibleRanges[0].start.line;
  const endLine = textEditor.visibleRanges[0].end.line;

  let code = '';

  // get the text from the line at the current position.
  // The line number is 0-based, so we add 1 to it to make it 1-based.
  while (currentLine < endLine) {
    code += `${currentLine + 1}: ${textEditor.document.lineAt(currentLine).text} \n`;
    // move to the next line position
    currentLine++;
  }
  return code;
}
このコードは、TextEditor の visibleRanges プロパティを使用して、現在エディタに表示されている行の位置を取得します。次に、最初の行の位置から開始し、最後の行の位置まで移動し、各行のコードを行番号とともに文字列に追加します。最後に、行番号付きの表示可能なすべてのコードを含む文字列を返します。
これで、code-tutor.annotate コマンドからこのメソッドを呼び出すことができます。コマンドの実装を次のように変更します。
const disposable = vscode.commands.registerTextEditorCommand(
  'code-tutor.annotate',
  async (textEditor: vscode.TextEditor) => {
    // Get the code with line numbers from the current editor
    const codeWithLineNumbers = getVisibleCodeWithLineNumbers(textEditor);
  }
);
ステップ 2:言語モデル API にコードとプロンプトを送信する
次のステップは、GitHub Copilot 言語モデルを呼び出し、ユーザーのコードと注釈を作成するように指示を送信することです。
これを行うには、まず使用したいチャットモデルを指定する必要があります。ここでは 4o を選択します。これは、構築している種類の対話に対して高速で高性能なモデルであるためです。
const disposable = vscode.commands.registerTextEditorCommand(
  'code-tutor.annotate',
  async (textEditor: vscode.TextEditor) => {
    // Get the code with line numbers from the current editor
    const codeWithLineNumbers = getVisibleCodeWithLineNumbers(textEditor);

    // select the 4o chat model
    let [model] = await vscode.lm.selectChatModels({
      vendor: 'copilot',
      family: 'gpt-4o'
    });
  }
);
注釈を作成するようにモデルに指示し、応答の形式を指定するための指示、つまり「プロンプト」が必要です。ファイルをインポートのすぐ下の一番上まで、次のコードを追加します。
const ANNOTATION_PROMPT = `You are a code tutor who helps students learn how to write better code. Your job is to evaluate a block of code that the user gives you and then annotate any lines that could be improved with a brief suggestion and the reason why you are making that suggestion. Only make suggestions when you feel the severity is enough that it will impact the readability and maintainability of the code. Be friendly with your suggestions and remember that these are students so they need gentle guidance. Format each suggestion as a single JSON object. It is not necessary to wrap your response in triple backticks. Here is an example of what your response should look like:

{ "line": 1, "suggestion": "I think you should use a for loop instead of a while loop. A for loop is more concise and easier to read." }{ "line": 12, "suggestion": "I think you should use a for loop instead of a while loop. A for loop is more concise and easier to read." }
`;
これは、注釈を生成する方法を言語モデルに指示する特別なプロンプトです。また、モデルが応答をどのようにフォーマットすべきかの例も含まれています。これらの例(「マルチショット」とも呼ばれます)は、解析して注釈として表示できるように、応答の形式を定義できるようにするものです。
モデルにメッセージを配列で渡します。この配列には、任意の数のメッセージを含めることができます。この場合、プロンプトに続いて行番号付きのユーザーコードが含まれます。
const disposable = vscode.commands.registerTextEditorCommand(
  'code-tutor.annotate',
  async (textEditor: vscode.TextEditor) => {
    // Get the code with line numbers from the current editor
    const codeWithLineNumbers = getVisibleCodeWithLineNumbers(textEditor);

    // select the 4o chat model
    let [model] = await vscode.lm.selectChatModels({
      vendor: 'copilot',
      family: 'gpt-4o'
    });

    // init the chat message
    const messages = [
      vscode.LanguageModelChatMessage.User(ANNOTATION_PROMPT),
      vscode.LanguageModelChatMessage.User(codeWithLineNumbers)
    ];
  }
);
メッセージをモデルに送信するには、まず選択したモデルが利用可能であることを確認する必要があります。これにより、拡張機能の準備ができていない場合や、ユーザーが GitHub Copilot にサインインしていない場合に対応できます。次に、モデルにメッセージを送信します。
const disposable = vscode.commands.registerTextEditorCommand(
  'code-tutor.annotate',
  async (textEditor: vscode.TextEditor) => {
    // Get the code with line numbers from the current editor
    const codeWithLineNumbers = getVisibleCodeWithLineNumbers(textEditor);

    // select the 4o chat model
    let [model] = await vscode.lm.selectChatModels({
      vendor: 'copilot',
      family: 'gpt-4o'
    });

    // init the chat message
    const messages = [
      vscode.LanguageModelChatMessage.User(ANNOTATION_PROMPT),
      vscode.LanguageModelChatMessage.User(codeWithLineNumbers)
    ];

    // make sure the model is available
    if (model) {
      // send the messages array to the model and get the response
      let chatResponse = await model.sendRequest(
        messages,
        {},
        new vscode.CancellationTokenSource().token
      );

      // handle chat response
      await parseChatResponse(chatResponse, textEditor);
    }
  }
);
チャット応答はフラグメントとして返されます。これらのフラグメントは通常、単一の単語を含みますが、句読点のみを含む場合もあります。応答がストリーミングされるときに注釈を表示するには、完全な注釈が得られるまで待ってから表示したいと考えています。モデルに応答を返すように指示した方法により、閉じ括弧 } が表示されたときに完全な注釈が得られることがわかります。その後、注釈を解析してエディタに表示できます。
extension.ts ファイルの getVisibleCodeWithLineNumbers メソッドのすぐ上に、欠落している parseChatResponse 関数を追加します。
async function parseChatResponse(
  chatResponse: vscode.LanguageModelChatResponse,
  textEditor: vscode.TextEditor
) {
  let accumulatedResponse = '';

  for await (const fragment of chatResponse.text) {
    accumulatedResponse += fragment;

    // if the fragment is a }, we can try to parse the whole line
    if (fragment.includes('}')) {
      try {
        const annotation = JSON.parse(accumulatedResponse);
        applyDecoration(textEditor, annotation.line, annotation.suggestion);
        // reset the accumulator for the next line
        accumulatedResponse = '';
      } catch (e) {
        // do nothing
      }
    }
  }
}
注釈を実際に表示するには、もう 1 つメソッドが必要です。VS Code では、これらを「デコレーション」と呼びます。extension.ts ファイルの parseChatResponse メソッドのすぐ上に、次のメソッドを追加します。
function applyDecoration(editor: vscode.TextEditor, line: number, suggestion: string) {
  const decorationType = vscode.window.createTextEditorDecorationType({
    after: {
      contentText: ` ${suggestion.substring(0, 25) + '...'}`,
      color: 'grey'
    }
  });

  // get the end of the line with the specified line number
  const lineLength = editor.document.lineAt(line - 1).text.length;
  const range = new vscode.Range(
    new vscode.Position(line - 1, lineLength),
    new vscode.Position(line - 1, lineLength)
  );

  const decoration = { range: range, hoverMessage: suggestion };

  vscode.window.activeTextEditor?.setDecorations(decorationType, [decoration]);
}
このメソッドは、モデルから解析された注釈を受け取り、それを使用してデコレーションを作成します。これは、まずデコレーションの外観を指定する TextEditorDecorationType を作成することによって行われます。この場合、グレーの注釈を追加し、25 文字に切り詰めるだけです。ユーザーがメッセージにホバーすると、完全なメッセージが表示されます。
次に、デコレーションを表示する場所を設定します。注釈で指定された行番号、行の末尾に配置する必要があります。
最後に、アクティブなテキストエディタにデコレーションを設定します。これにより、注釈がエディタに表示されます。
拡張機能がまだ実行中の場合は、デバッグバーの緑色の矢印を選択して再起動します。デバッグセッションを閉じた場合は、F5 キーを押して拡張機能を実行します。開いた新しい VS Code ウィンドウインスタンスでコードファイルを開きます。コマンドパレットから「Toggle Tutor Annotations」を選択すると、コード注釈がエディタに表示されるはずです。

エディタのタイトルバーにボタンを追加する
コマンドパレット以外の場所からコマンドを呼び出すことができます。この場合、現在のタブの上部にボタンを追加して、ユーザーが注釈を簡単に切り替えられるようにすることができます。
これを行うには、package.json の "contributes" 部分を次のように変更します。
"contributes": {
  "commands": [
    {
      "command": "code-tutor.annotate",
      "title": "Toggle Tutor Annotations",
      "icon": "$(comment)"
    }
  ],
  "menus": {
    "editor/title": [
      {
        "command": "code-tutor.annotate",
        "group": "navigation"
      }
    ]
  }
}
これにより、エディタのタイトルバーのナビゲーション領域(右側)にボタンが表示されます。「icon」は Product Icon Reference から取得されます。
緑色の矢印で拡張機能を再起動するか、拡張機能がまだ実行されていない場合は F5 キーを押します。コメントアイコンが表示され、「Toggle Tutor Annotations」コマンドがトリガーされるはずです。
次のステップ
このチュートリアルでは、Language Model API を使用して AI をエディタに統合する VS Code 拡張機能の作成方法を学びました。VS Code 拡張機能 API を使用して現在のタブからコードを取得し、カスタムプロンプトとともにモデルに送信し、デコレータを使用してモデルの結果を解析してエディタに直接表示しました。
次に、コードチューター拡張機能を拡張して、チャット参加者を含めることができます。これにより、ユーザーは GitHub Copilot チャットインターフェースを介して拡張機能と直接対話できるようになります。また、VS Code の API の全範囲を探索して、エディタでカスタム AI 体験を構築するための新しい方法を探索することもできます。
このチュートリアルの完全なソースコードは、vscode-extensions-sample リポジトリで見つけることができます。