チュートリアル: Chat API を使用してコードチュートリアルチャット参加者を作成する
このチュートリアルでは、GitHub Copilot Chat エクスペリエンスと統合する Visual Studio Code 拡張機能を作成する方法を学びます。Chat 拡張機能 API を使用してチャット参加者を提供します。参加者は、プログラミングの概念について説明やサンプル演習を提供できるコードチューターになります。
前提条件
このチュートリアルを完了するには、以下のツールとアカウントが必要です
ステップ 1: プロジェクトをセットアップする
まず、Yeoman と VS Code 拡張機能ジェネレーターを使用して拡張機能プロジェクトを生成します。
npx --package yo --package generator-code -- yo code
セットアップを完了するために、以下のオプションを選択します
# ? What type of extension do you want to create? New Extension (TypeScript)
# ? What's the name of your extension? Code Tutor

### Press <Enter> to choose default for all options below ###

# ? What's the identifier of your extension? code-tutor
# ? What's the description of your extension? LEAVE BLANK
# ? Initialize a git repository? Yes
# ? Bundle the source code with webpack? No
# ? Which package manager to use? npm

# ? Do you want to open the new folder with Visual Studio Code? Open with `code`
拡張機能プロジェクトが生成されたら、作業するファイルは extension.ts と package.json の 2 つです。詳細については、拡張機能の構造に関するドキュメントで確認できます。概要として
extension.tsは拡張機能のメインエントリポイントであり、チャット参加者のロジックが含まれています。package.jsonには、参加者の名前や説明など、拡張機能のメタデータが含まれています。
extension.ts の activate() メソッド内の自動生成されたコードを削除します。ここにチャット参加者のロジックを配置します。
ステップ 2: チャット参加者を登録する
package.json ファイルで、自動生成された contributes セクションを以下に置き換えます
"contributes":{
    "chatParticipants": [
    {
        "id": "chat-tutorial.code-tutor",
        "fullName": "Code Tutor",
        "name": "tutor",
        "description": "What can I teach you?",
        "isSticky": true
    }
    ]
}
このコードは、以下の属性を持つチャット参加者を登録します
- コード内で参照される一意の ID
chat-tutorial.code-tutor - 参加者からの応答のタイトル領域に表示されるフルネーム
Code Tutor - チャットビューで
@tutorとしてチャット参加者を参照するために使用される名前tutor - チャット入力フィールドにプレースホルダーテキストとして表示される説明「何をお教えしましょうか?」
最後に、isSticky: true を設定すると、ユーザーが参加者との対話を開始した後、チャット入力フィールドに自動的に参加者名が先行入力されます。
ステップ 3: プロンプトを作成する
参加者が登録されたので、コードチューターのロジックの実装を開始できます。extension.ts ファイルで、リクエストのプロンプトを定義します。
良いプロンプトを作成することが、参加者から最良の応答を得るための鍵です。プロンプトエンジニアリングのヒントについては、この記事を確認してください。
コードチューターは、直接的な答えを提供するのではなく、生徒が概念を理解するように導くことで、現実世界のチューターを模倣する必要があります。さらに、チューターはトピックに焦点を当て続け、プログラミング以外の質問には答えないようにする必要があります。
次の 2 つのプロンプトを検討してください。どちらが指定された動作をより引き出す可能性が高いでしょうか?
-
あなたは親切なコードチューターです。あなたの仕事は、ユーザーに概念の簡単な説明とサンプルコードで教えることです。
-
あなたは親切なコードチューターです。あなたの仕事は、ユーザーに概念の簡単な説明とサンプルコードで教えることです。一連のメッセージで概念のガイド付き概要を応答してください。ユーザーに直接答えを与えず、自分で答えを見つけるように導いてください。ユーザーがプログラミング以外の質問をした場合は、丁重に返答を拒否してください。
2 番目のプロンプトはより具体的で、参加者にどのように応答するか明確な方向性を示しています。このプロンプトを extension.ts ファイルに追加します。
const BASE_PROMPT =
  'You are a helpful code tutor. Your job is to teach the user with simple descriptions and sample code of the concept. Respond with a guided overview of the concept in a series of messages. Do not give the user the answer directly, but guide them to find the answer themselves. If the user asks a non-programming question, politely decline to respond.';
ステップ 4: リクエストハンドラーを実装する
プロンプトが選択されたので、リクエストハンドラーを実装する必要があります。これは、ユーザーのチャットリクエストを処理するものです。リクエストハンドラーを定義し、リクエストを処理するためのロジックを実行し、ユーザーに応答を返します。
まず、ハンドラーを定義します
// define a chat handler
const handler: vscode.ChatRequestHandler = async (
  request: vscode.ChatRequest,
  context: vscode.ChatContext,
  stream: vscode.ChatResponseStream,
  token: vscode.CancellationToken
) => {
  return;
};
このハンドラーの本体内で、プロンプトと messages 配列をプロンプトで初期化します。次に、ユーザーがチャットボックスに入力した内容を送信します。これには request.prompt を介してアクセスできます。
request.model.sendRequest を使用してリクエストを送信します。これにより、現在選択されているモデルを使用してリクエストが送信されます。最後に、応答をユーザーにストリームします。
// define a chat handler
const handler: vscode.ChatRequestHandler = async (
  request: vscode.ChatRequest,
  context: vscode.ChatContext,
  stream: vscode.ChatResponseStream,
  token: vscode.CancellationToken
) => {
  // initialize the prompt
  let prompt = BASE_PROMPT;

  // initialize the messages array with the prompt
  const messages = [vscode.LanguageModelChatMessage.User(prompt)];

  // add in the user's message
  messages.push(vscode.LanguageModelChatMessage.User(request.prompt));

  // send the request
  const chatResponse = await request.model.sendRequest(messages, {}, token);

  // stream the response
  for await (const fragment of chatResponse.text) {
    stream.markdown(fragment);
  }

  return;
};
ステップ 5: チャット参加者を作成する
ハンドラーが実装されたら、最後のステップは、Chat 拡張機能 API の createChatParticipant メソッドを使用してチャット参加者を作成することです。package.json で使用したのと同じ ID を使用してください。
アイコンを追加して、参加者をさらにカスタマイズする必要があります。これは、参加者と対話するときにチャットビューに表示されます。
// define a chat handler
const handler: vscode.ChatRequestHandler = async (
  request: vscode.ChatRequest,
  context: vscode.ChatContext,
  stream: vscode.ChatResponseStream,
  token: vscode.CancellationToken
) => {
  // initialize the prompt
  let prompt = BASE_PROMPT;

  // initialize the messages array with the prompt
  const messages = [vscode.LanguageModelChatMessage.User(prompt)];

  // add in the user's message
  messages.push(vscode.LanguageModelChatMessage.User(request.prompt));

  // send the request
  const chatResponse = await request.model.sendRequest(messages, {}, token);

  // stream the response
  for await (const fragment of chatResponse.text) {
    stream.markdown(fragment);
  }

  return;
};

// create participant
const tutor = vscode.chat.createChatParticipant('chat-tutorial.code-tutor', handler);

// add icon to participant
tutor.iconPath = vscode.Uri.joinPath(context.extensionUri, 'tutor.jpeg');
ステップ 6: コードを実行する
これでチャット参加者を試す準備ができました!F5 を押してコードを実行します。VS Code の新しいウィンドウがチャット参加者と一緒に開きます。
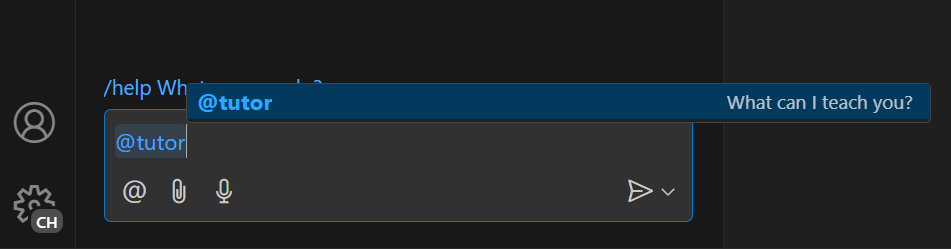
Copilot Chat ペインで、@tutor と入力して参加者を呼び出すことができます!
学習したいことを入力して試してみてください。概念の概要を示す応答が表示されるはずです!
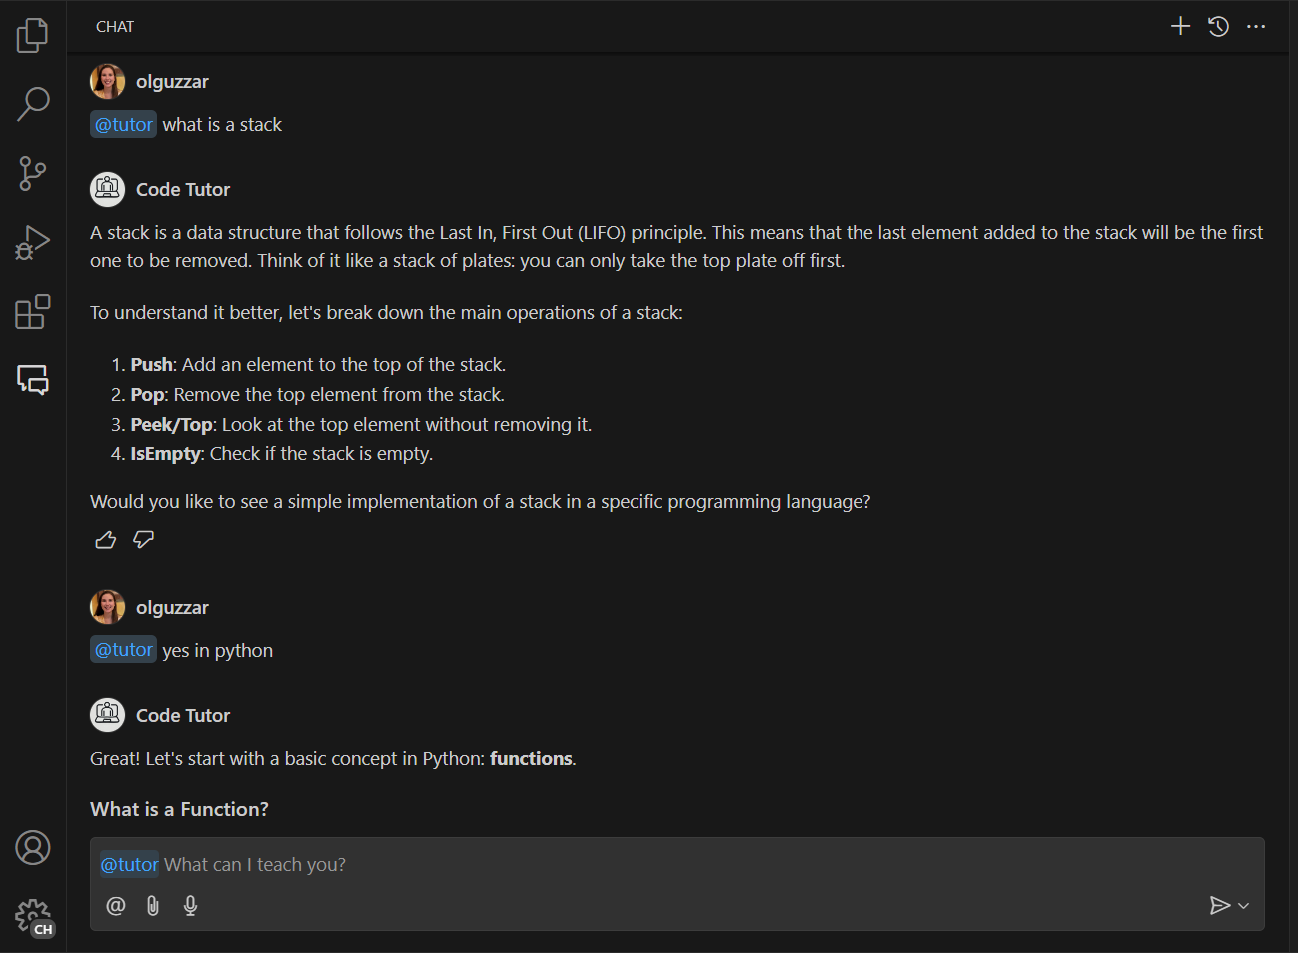
会話を続けるために関連メッセージを入力すると、参加者が会話に基づいてフォローアップの応答をしないことに気づくでしょう。これは、現在の参加者がユーザーの現在のメッセージのみを送信しており、参加者のメッセージ履歴を送信していないためです。
以下のスクリーンショットでは、チューターはスタックの最初の説明に正しく応答しています。しかし、フォローアップでは、ユーザーが Python でのスタックの実装を見るために会話を続けていることを理解していないため、代わりに Python に関する一般的な応答をしています。
ステップ 7: より多くのコンテキストのためにメッセージ履歴を追加する
Copilot Chat の最大の価値の 1 つは、最良の応答を得るために複数のメッセージを繰り返し処理できることです。これを行うには、参加者のメッセージ履歴をチャットリクエストに送信する必要があります。これには context.history を介してアクセスできます。
その履歴を取得し、messages 配列に追加する必要があります。これは request.prompt が追加される前に行う必要があります。
// define a chat handler
const handler: vscode.ChatRequestHandler = async (
  request: vscode.ChatRequest,
  context: vscode.ChatContext,
  stream: vscode.ChatResponseStream,
  token: vscode.CancellationToken
) => {
  // initialize the prompt
  let prompt = BASE_PROMPT;

  // initialize the messages array with the prompt
  const messages = [vscode.LanguageModelChatMessage.User(prompt)];

  // get all the previous participant messages
  const previousMessages = context.history.filter(
    h => h instanceof vscode.ChatResponseTurn
  );

  // add the previous messages to the messages array
  previousMessages.forEach(m => {
    let fullMessage = '';
    m.response.forEach(r => {
      const mdPart = r as vscode.ChatResponseMarkdownPart;
      fullMessage += mdPart.value.value;
    });
    messages.push(vscode.LanguageModelChatMessage.Assistant(fullMessage));
  });

  // add in the user's message
  messages.push(vscode.LanguageModelChatMessage.User(request.prompt));

  // send the request
  const chatResponse = await request.model.sendRequest(messages, {}, token);

  // stream the response
  for await (const fragment of chatResponse.text) {
    stream.markdown(fragment);
  }

  return;
};
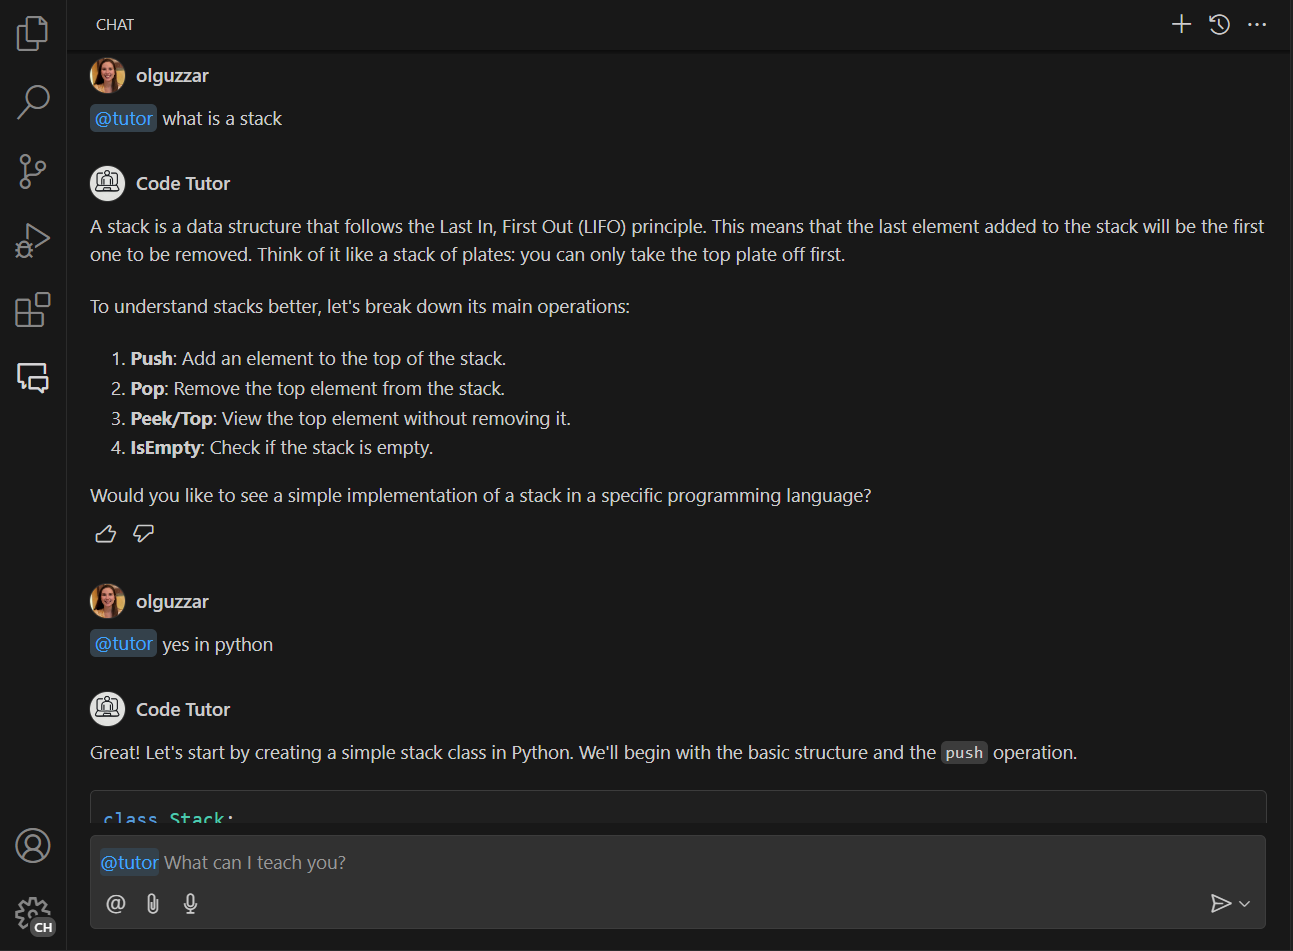
コードを実行すると、以前のすべてのメッセージのコンテキストを持つ参加者と会話できるようになります!以下のスクリーンショットでは、参加者はユーザーが Python でのスタックの実装を見るように要求していることを正しく理解しています。
ステップ 8: コマンドを追加する
基本的な参加者が実装されたので、コマンドを追加して拡張できます。コマンドは一般的なユーザーの意図の短縮表記であり、/ 記号で示されます。拡張機能はその後、コマンドを使用して言語モデルに適切にプロンプトを出すことができます。
概念の練習問題を与えるようにチューターに促すコマンドを追加すると良いでしょう。package.json ファイルにコマンドを登録し、extension.ts にロジックを実装する必要があります。コマンド名を exercise にすると、/exercise と入力することで呼び出せます。
package.json で、chatParticipants プロパティに commands プロパティを追加します。ここで、コマンドの名前と簡単な説明を指定します
"contributes": {
    "chatParticipants": [
      {
        "id": "chat-tutorial.code-tutor",
        "fullName": "Code Tutor",
        "name": "tutor",
        "description": "What can I teach you?",
        "isSticky": true,
        "commands": [
          {
            "name": "exercise",
            "description": "Provide exercises to practice a concept."
          }
        ]
      }
    ]
  },
チューターからサンプル演習を取得するロジックを実装する最も簡単な方法は、リクエストに送信するプロンプトを変更することです。参加者にサンプル演習を返すように依頼する新しいプロンプト EXERCISES_PROMPT を作成します。以下にその例を示します
const EXERCISES_PROMPT =
  'You are a helpful tutor. Your job is to teach the user with fun, simple exercises that they can complete in the editor. Your exercises should start simple and get more complex as the user progresses. Move one concept at a time, and do not move on to the next concept until the user provides the correct answer. Give hints in your exercises to help the user learn. If the user is stuck, you can provide the answer and explain why it is the answer. If the user asks a non-programming question, politely decline to respond.';
リクエストハンドラーでは、ユーザーがコマンドを参照したことを検出するロジックを追加する必要があります。これは request.command プロパティを介して行うことができます。
コマンドが参照された場合は、プロンプトを新しく作成した EXERCISES_PROMPT に更新します
// define a chat handler
const handler: vscode.ChatRequestHandler = async (
  request: vscode.ChatRequest,
  context: vscode.ChatContext,
  stream: vscode.ChatResponseStream,
  token: vscode.CancellationToken
) => {
  // initialize the prompt
  let prompt = BASE_PROMPT;

  if (request.command === 'exercise') {
    prompt = EXERCISES_PROMPT;
  }

  // initialize the messages array with the prompt
  const messages = [vscode.LanguageModelChatMessage.User(prompt)];

  // get all the previous participant messages
  const previousMessages = context.history.filter(
    h => h instanceof vscode.ChatResponseTurn
  );

  // add the previous messages to the messages array
  previousMessages.forEach(m => {
    let fullMessage = '';
    m.response.forEach(r => {
      const mdPart = r as vscode.ChatResponseMarkdownPart;
      fullMessage += mdPart.value.value;
    });
    messages.push(vscode.LanguageModelChatMessage.Assistant(fullMessage));
  });

  // add in the user's message
  messages.push(vscode.LanguageModelChatMessage.User(request.prompt));

  // send the request
  const chatResponse = await request.model.sendRequest(messages, {}, token);

  // stream the response
  for await (const fragment of chatResponse.text) {
    stream.markdown(fragment);
  }

  return;
};
追加する必要があるのはこれだけです!メッセージ履歴を取得し、リクエストを送信し、リクエストをストリームする残りのロジックはすべて同じです。
これで /exercise と入力すると、チャット参加者が表示され、コーディングを練習するためのインタラクティブな演習を入手できます!

次のステップ
おめでとうございます!プログラミングの概念について説明とサンプル演習を提供できるチャット参加者の作成に成功しました。プロンプトを微調整したり、さらにスラッシュコマンドを追加したり、言語モデル API のような他の API を活用したりすることで、参加者をさらに拡張できます。準備ができたら、拡張機能を Visual Studio Code Marketplace に公開することもできます。
このチュートリアルの完全なソースコードは、vscode-extensions-sample リポジトリで見つけることができます。